micro_sam
Segment Anything for Microscopy
Segment Anything for Microscopy implements automatic and interactive annotation for microscopy data. It is built on top of Segment Anything by Meta AI and specializes it for microscopy and other biomedical imaging data. Its core components are:
- The
micro_samtools for interactive data annotation, built as napari plugin. - The
micro_samlibrary to apply Segment Anything to 2d and 3d data or fine-tune it on your data. - The
micro_sammodels that are fine-tuned on publicly available microscopy data and that are available on BioImage.IO.
Based on these components micro_sam enables fast interactive and automatic annotation for microscopy data, like interactive cell segmentation from bounding boxes:
micro_sam is now available as stable version 1.0 and we will not change its user interface significantly in the foreseeable future.
We are still working on improving and extending its functionality. The current roadmap includes:
- Releasing more and better finetuned models for the biomedical imaging domain.
- Integrating parameter efficient training and compressed models for efficient fine-tuning and faster inference.
- Support for SAM2 and SAM3.
If you run into any problems or have questions please open an issue or reach out via image.sc using the tag micro-sam.
You can follow recent updates on micro_sam in our news feed.
Quickstart
You can install micro_sam via conda:
conda install -c conda-forge micro_sam
We also provide installers for Windows and Linux. For more details on the available installation options, check out the installation section.
After installing micro_sam, you can start napari from within your environment using
napari
After starting napari, you can select the annotation tool you want to use from Plugins -> Segment Anything for Microscopy. Check out the quickstart tutorial video for a short introduction, the video of our virtual I2K tutorial for an in-depth explanation and the annotation tool section for details.
The micro_sam python library can be imported via
import micro_sam
It is explained in more detail here.
We also have a quick start notebook here.
We provide different finetuned models for microscopy that can be used within our tools or any other tool that supports Segment Anything. See finetuned models for details on the available models. You can also train models on your own data, see here for details.
Citation
If you are using micro_sam in your research please cite
- our paper (now published in Nature Methods!)
- and the original Segment Anything publication.
- If you use a
vit-tinymodels, please also cite Mobile SAM. - If you use automatic tracking, please also cite Trackastra.
Installation
There are four ways to install micro_sam:
- From pip to use all functionality and install via pip.
- From conda to use all functionality and install in an encapsulated environment.
- From source for setting up a development environment to use the latest version and to change and contribute to our software.
- From installer to install it without having to use pip or conda (supported platforms: Windows and Linux, supports only CPU, deprecated).
You can find more information on the installation and how to troubleshoot it in the FAQ section.
From pip
pip is the default python package manager. You can install micro_sam via pip with the command:
pip install micro_sam
Note: when using pip you have to manage your python environments yourself. For example, you could create a conda environment and install micro_sam via pip in there, or use venv for this.
To use the vit_t (MobileSAM) model, you have to additionally install MobileSAM in the environment where micro_sam was installed via pip. It is not available on PyPI, so it has to be installed from GitHub:
pip install git+https://github.com/ChaoningZhang/MobileSAM.git
From conda
conda is a python package manager. If you don't have it installed yet you can follow the instructions here or look into our installation FAQs to set it up on your system.
Please make sure that you are using an up-to-date version of conda to install micro_sam.
You can also use mamba, which is a drop-in replacement for conda, to install it. In this case, just replace the conda commands below with mamba.
IMPORTANT: Do not install micro_sam in the base conda environment.
micro_sam can be installed in an existing environment via:
conda install -c conda-forge micro_sam
or you can create a new environment with it (here called micro-sam) via:
conda create -c conda-forge -n micro-sam micro_sam
and then activate it via
conda activate micro-sam
This will also install pytorch from the conda-forge channel. If you have a recent enough operating system, it will automatically install the best suitable pytorch version on your system.
This means it will install the CPU version if you don't have a nvidia GPU, and will install a GPU version if you have.
However, if you have an older operating system, or a CUDA version older than 12, than it may not install the correct version. In this case you will have to specify you're CUDA version, for example for CUDA 11, like this:
conda install -c conda-forge micro_sam "libtorch=*=cuda11*"
From source
To install micro_sam from source, we recommend to first set up an environment with the necessary requirements:
- environment.yaml: to set up an environment on Windows, Linux or Mac OS.
To create one of these environments and install micro_sam into it follow these steps
- Clone the repository:
git clone https://github.com/computational-cell-analytics/micro-sam
- Enter it:
cd micro-sam
- Create the respective environment:
conda env create -f environment.yaml
- Activate the environment:
conda activate sam
- Install
micro_sam:
pip install -e .
From installer
Note: The installers are not yet up-to-date with the latest version of micro-sam (v1.4.0 onwards). We recommend installing micro-sam via pip or conda instead.
We also provide installers for Linux and Windows:
The installers will not enable you to use a GPU, so if you have one then please consider installing micro_sam via pip or conda instead.
Linux Installer:
To use the installer:
- Unpack the zip file you have downloaded.
- Make the installer executable:
$ chmod +x micro_sam-1.0.0post0-Linux-x86_64.sh - Run the installer:
./micro_sam-1.0.0post0-Linux-x86_64.sh - After the installation you can start the annotator with the command
.../micro_sam/bin/napari.- Proceed with the steps described in Annotation Tools
- To make it easier to run the annotation tool you can add
.../micro_sam/binto yourPATHor set a softlink to.../micro_sam/bin/napari.
Windows Installer:
- Unpack the zip file you have downloaded.
- Run the installer by double clicking on it.
- Choose installation type:
Just Me(recommended)orAll Users(requires admin privileges). - Choose installation path. By default it will be installed in
C:\Users\<Username>\micro_samforJust Meinstallation or inC:\ProgramData\micro_samforAll Users.- The installer will unpack all micro_sam files to the installation directory.
- After the installation you can start the annotator by double clicking on
.\micro_sam\Scripts\micro_sam.annotator.exeor with the command.\micro_sam\Scripts\napari.exefrom the Command Prompt. - Proceed with the steps described in Annotation Tools
Easybuild installation
There is also an easy-build recipe for micro_sam under development. You can find more information here.
Annotation Tools
micro_sam provides applications for fast interactive 2d segmentation, 3d segmentation and tracking.
See an example for interactive cell segmentation in phase-contrast microscopy (left), interactive segmentation
of mitochondria in volume EM (middle) and interactive tracking of cells (right).
The annotation tools can be started from the napari plugin menu, the command line or from python scripts.
They are built as napari plugin and make use of existing napari functionality wherever possible. If you are not familiar with napari, we recommend to start here.
The micro_sam tools mainly use the point layer, shape layer and label layer.
The annotation tools are explained in detail below. We also provide video tutorials.
The annotation tools can be started from the napari plugin menu:
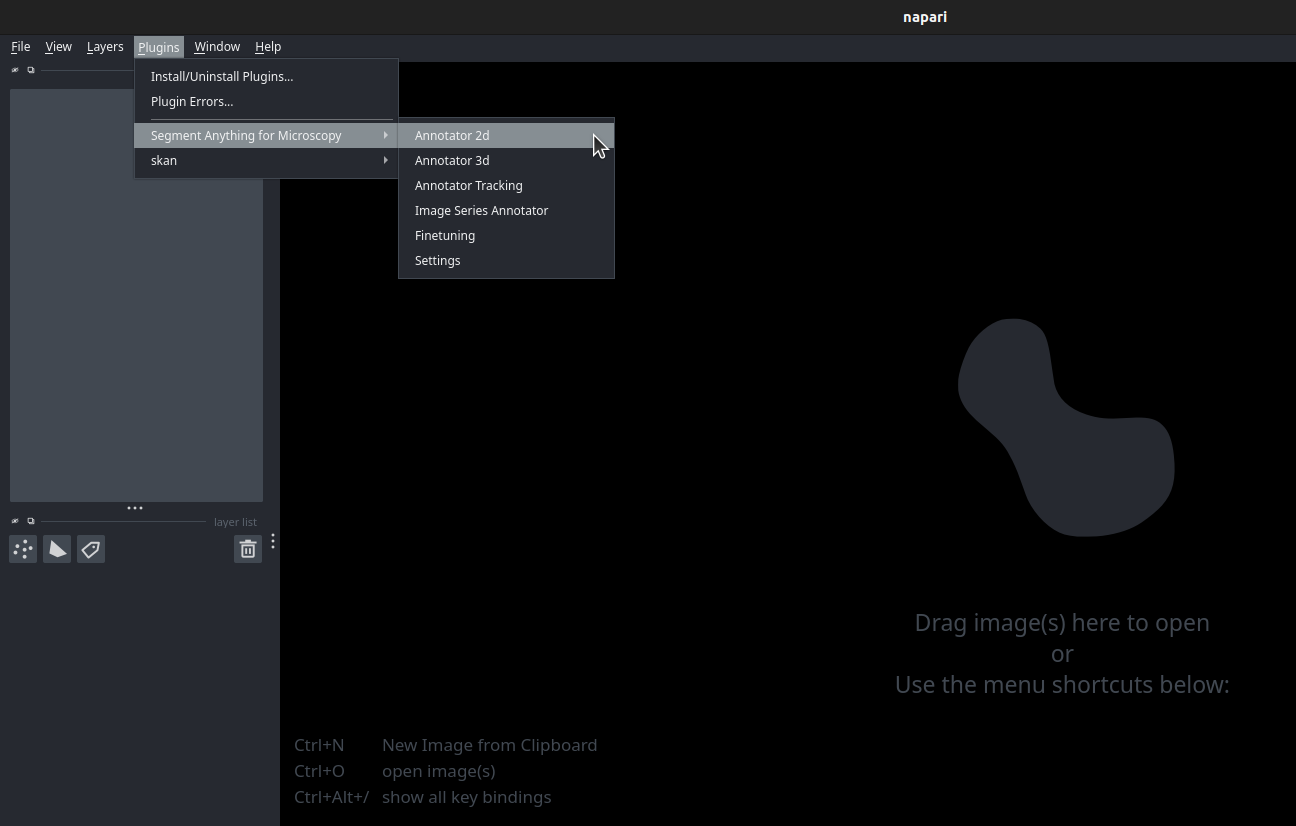
You can find additional information on the annotation tools in the FAQ section.
HINT: If you would like to start napari to use micro-sam from the plugin menu, you must start it by activating the environment where micro-sam has been installed using:
conda activate <ENVIRONMENT_NAME>
napari
Annotator 2D
The 2d annotator can be started by
- clicking
Annotator 2din the plugin menu after startingnapari. - running
$ micro_sam.annotator_2din the command line. - calling
micro_sam.sam_annotator.annotator_2din a python script. Check out examples/annotator_2d.py for details.
The user interface of the 2d annotator looks like this:
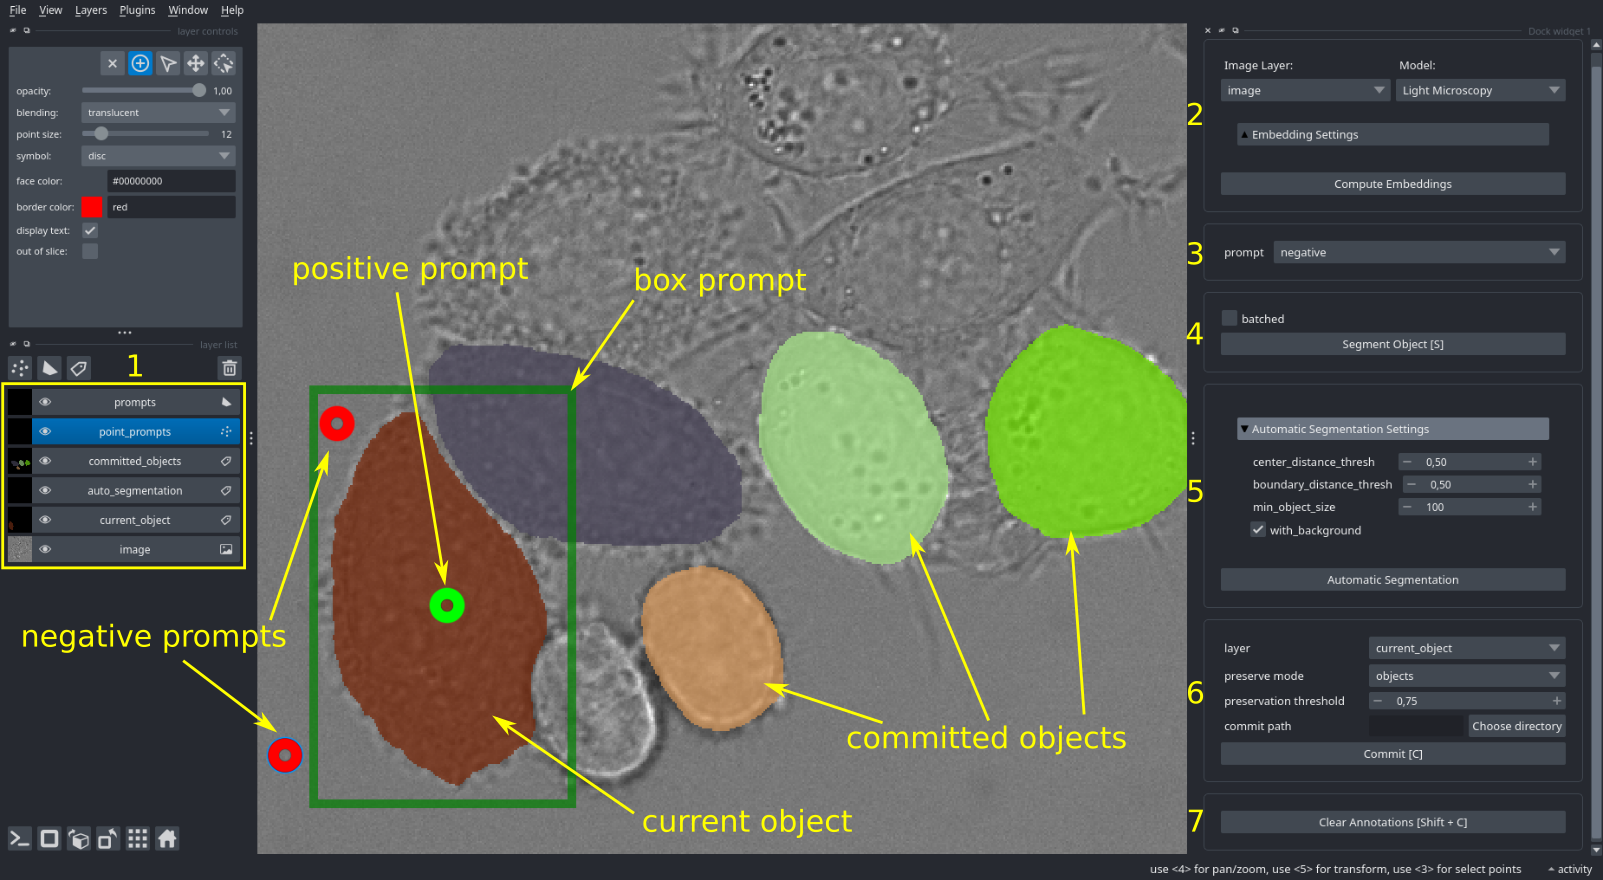
It contains the following elements:
- The napari layers for the segmentations and prompts:
prompts: shape layer that is used to provide box prompts to Segment Anything. Prompts can be given as rectangle (marked as box prompt in the image), ellipse or polygon.point_prompts: point layer that is used to provide point prompts to Segment Anything. Positive prompts (green points) for marking the object you want to segment, negative prompts (red points) for marking the outside of the object.committed_objects: label layer with the objects that have already been segmented.auto_segmentation: label layer with the results from automatic instance segmentation.current_object: label layer for the object(s) you're currently segmenting.
- The embedding menu. For selecting the image to process, the Segment Anything model that is used and computing its image embeddings. The
Embedding Settingscontain advanced settings for loading cached embeddings from file or for using tiled embeddings. - The prompt menu for changing whether the currently selected point is a positive or a negative prompt. This can also be done by pressing
T. - The menu for interactive segmentation. Clicking
Segment Object(or pressingS) will run segmentation for the current prompts. The result is displayed incurrent_object. Activatingbatchedenables segmentation of multiple objects with point prompts. In this case one object will be segmented per positive prompt. - The menu for automatic segmentation. Clicking
Automatic Segmentationwill segment all objects n the image. The results will be displayed in theauto_segmentationlayer. We support two different methods for automatic segmentation: automatic mask generation (supported for all models) and instance segmentation with an additional decoder (only supported for our models). Changing the parameters underAutomatic Segmentation Settingscontrols the segmentation results, check the tooltips for details. - The menu for commiting the segmentation. When clicking
Commit(or pressingC) the result from the selected layer (eithercurrent_objectorauto_segmentation) will be transferred from the respective layer tocommitted_objects. Whencommit_pathis given the results will automatically be saved there. - The menu for clearing the current annotations. Clicking
Clear Annotations(or pressingShift + C) will clear the current annotations and the current segmentation.
Point prompts and box prompts can be combined. When you're using point prompts you can only segment one object at a time, unless the batched mode is activated. With box prompts you can segment several objects at once, both in the normal and batched mode.
Check out the video tutorial for an in-depth explanation on how to use this tool.
Annotator 3D
The 3d annotator can be started by
- clicking
Annotator 3din the plugin menu after startingnapari. - running
$ micro_sam.annotator_3din the command line. - calling
micro_sam.sam_annotator.annotator_3din a python script. Check out examples/annotator_3d.py for details.
The user interface of the 3d annotator looks like this:
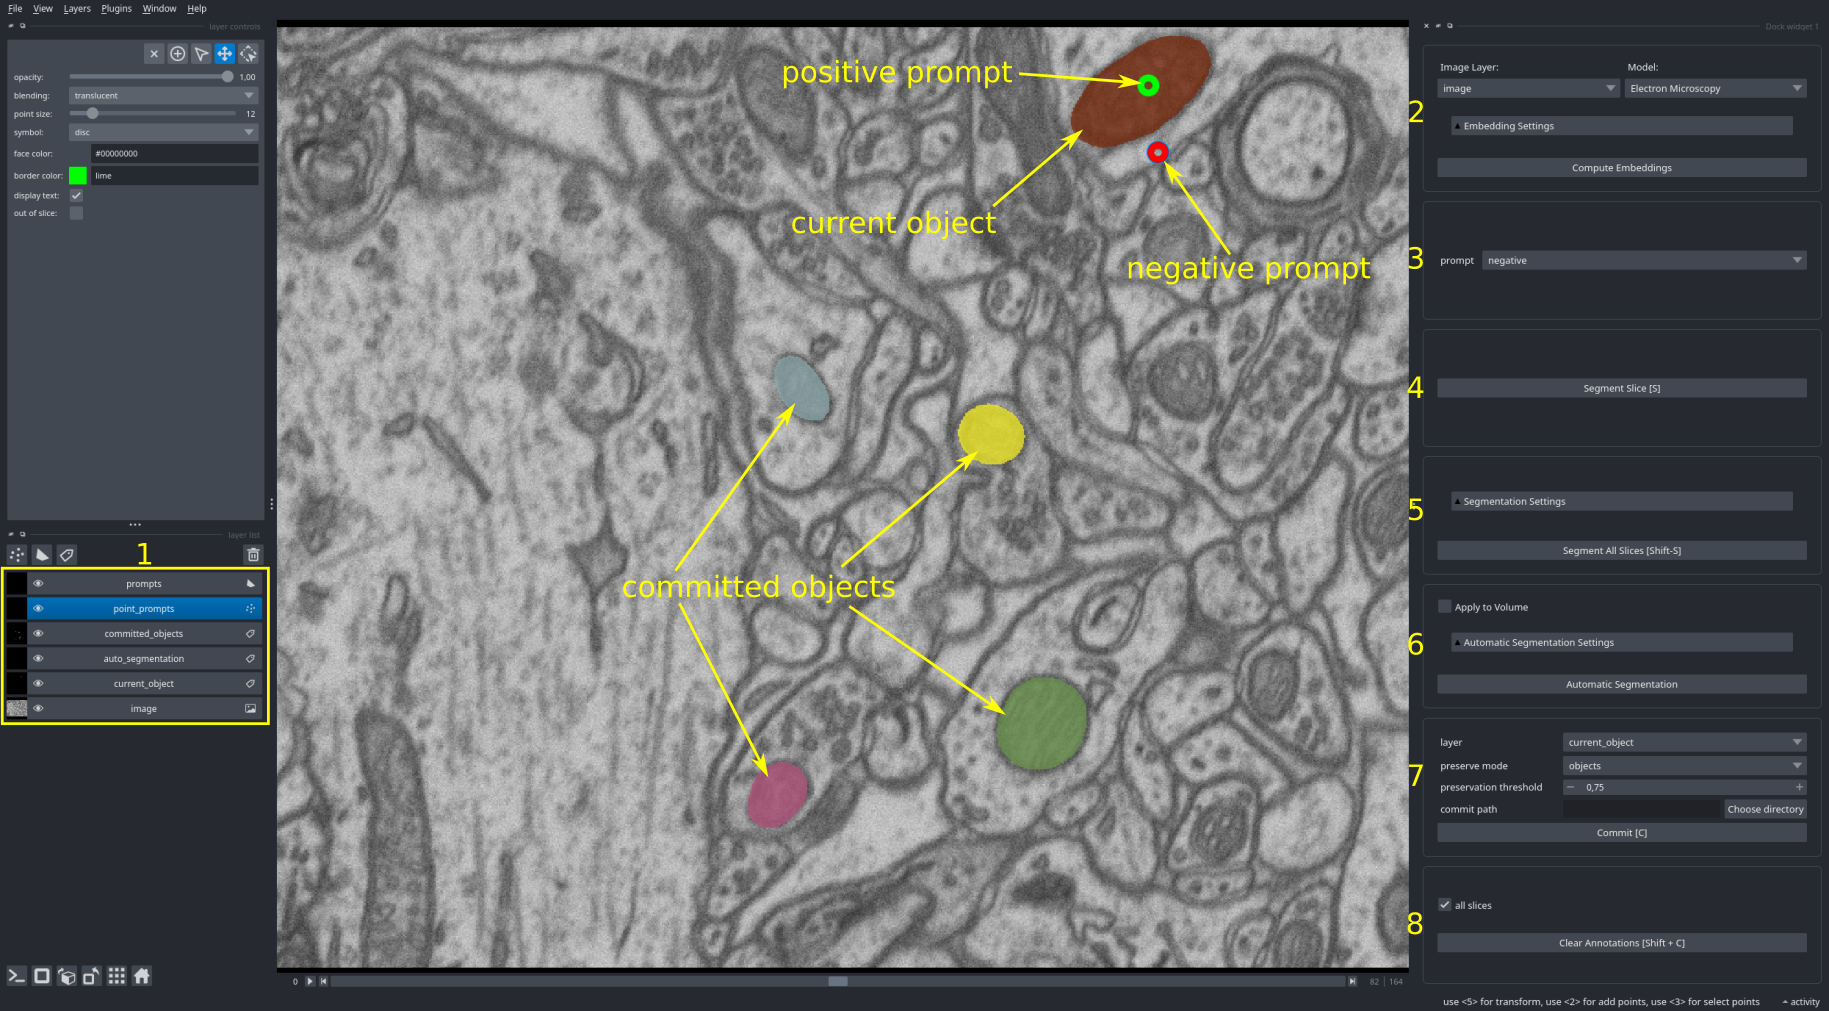
Most elements are the same as in the 2d annotator:
- The napari layers that contain the segmentations and prompts.
- The embedding menu.
- The prompt menu.
- The menu for interactive segmentation in the current slice.
- The menu for interactive 3d segmentation. Clicking
Segment All Slices(or pressingShift + S) will extend the segmentation of the current object across the volume by projecting prompts across slices. The parameters for prompt projection can be set inSegmentation Settings, please refer to the tooltips for details. - The menu for automatic segmentation. The functionality is similar to the 2d annotator. To segment the full volume
Apply to Volumeneeds to be activated, otherwise only the current slice will be segmented. For volumetric segmentation, each slice is first segmented individually and then Multicut based on object overlap is used to merge objects across slices. Note that 3D segmentation can take quite long without a GPU. - The menu for committing the current object.
- The menu for clearing the current annotations. If
all slicesis set all annotations will be cleared, otherwise they are only cleared for the current slice.
You can only segment one object at a time using the interactive segmentation functionality with this tool.
Check out the video tutorial for an in-depth explanation on how to use this tool.
Annotator Tracking
The tracking annotator can be started by
- clicking
Annotator Trackingin the plugin menu after startingnapari. - running
$ micro_sam.annotator_trackingin the command line. - calling
micro_sam.sam_annotator.annotator_trackingin a python script. Check out examples/annotator_tracking.py for details.
The user interface of the tracking annotator looks like this:
![]()
Most elements are the same as in the 2d annotator:
- The napari layers that contain the segmentations and prompts. Same as for the 2d segmentation application but without the
auto_segmentationlayer. - The embedding menu.
- The prompt menu.
- The menu with tracking settings:
track_stateis used to indicate that the object you are tracking is dividing in the current frame.track_idis used to select which of the tracks after division you are following. - The menu for interactive segmentation in the current frame.
- The menu for interactive tracking. Click
Track Object(or pressShift + S) to segment the current object across time. - The menu for automatic tracking. The functionality is similar to the 2d annotator. To track cells across time
Track Timeseriesneeds to be activated, otherwise only the current frame will be segmented. For tracking, each frame is first segmented individually and then tracked with trackastra. You need to install trackastra to use this feature. Note that automatic tracking can take quite long without a GPU. - The menu for committing the current tracking result.
- The menu for clearing the current annotations.
The tracking annotator only supports 2d image data with a time dimension, volumetric data + time is not supported. Check out the video tutorial for an in-depth explanation on how to use this tool.
Image Series Annotator
The image series annotation tool enables running the 2d annotator or 3d annotator for multiple images that are saved in a folder. This makes it convenient to annotate many images without having to restart the tool for every image. It can be started by
- clicking
Image Series Annotatorin the plugin menu after startingnapari. - running
$ micro_sam.image_series_annotatorin the command line. - calling
micro_sam.sam_annotator.image_series_annotatorin a python script. Check out examples/image_series_annotator.py for details.
When starting this tool via the plugin menu the following interface opens:

You can select the folder where your images are saved with Input Folder. The annotation results will be saved in Output Folder.
You can specify a rule for loading only a subset of images via pattern, for example *.tif to only load tif images. Set is_volumetric if the data you want to annotate is 3d. The rest of the options are settings for the image embedding computation and are the same as for the embedding menu (see above).
Once you click Annotate Images the images from the folder you have specified will be loaded and the annotation tool is started for them.
This menu will not open if you start the image series annotator from the command line or via python. In this case the input folder and other settings are passed as parameters instead.
Check out the video tutorial for an in-depth explanation on how to use the image series annotator.
Object Classification
We have recently implemented an experimental workflow for object classification with micro_sam. It can be started by:
- clicking
Object Classifierin the plugin menu after startingnapari. - calling
micro_sam.sam_annotator.object_classifier.object_classifierin a python script.
When starting this workflow the following interface opens up.
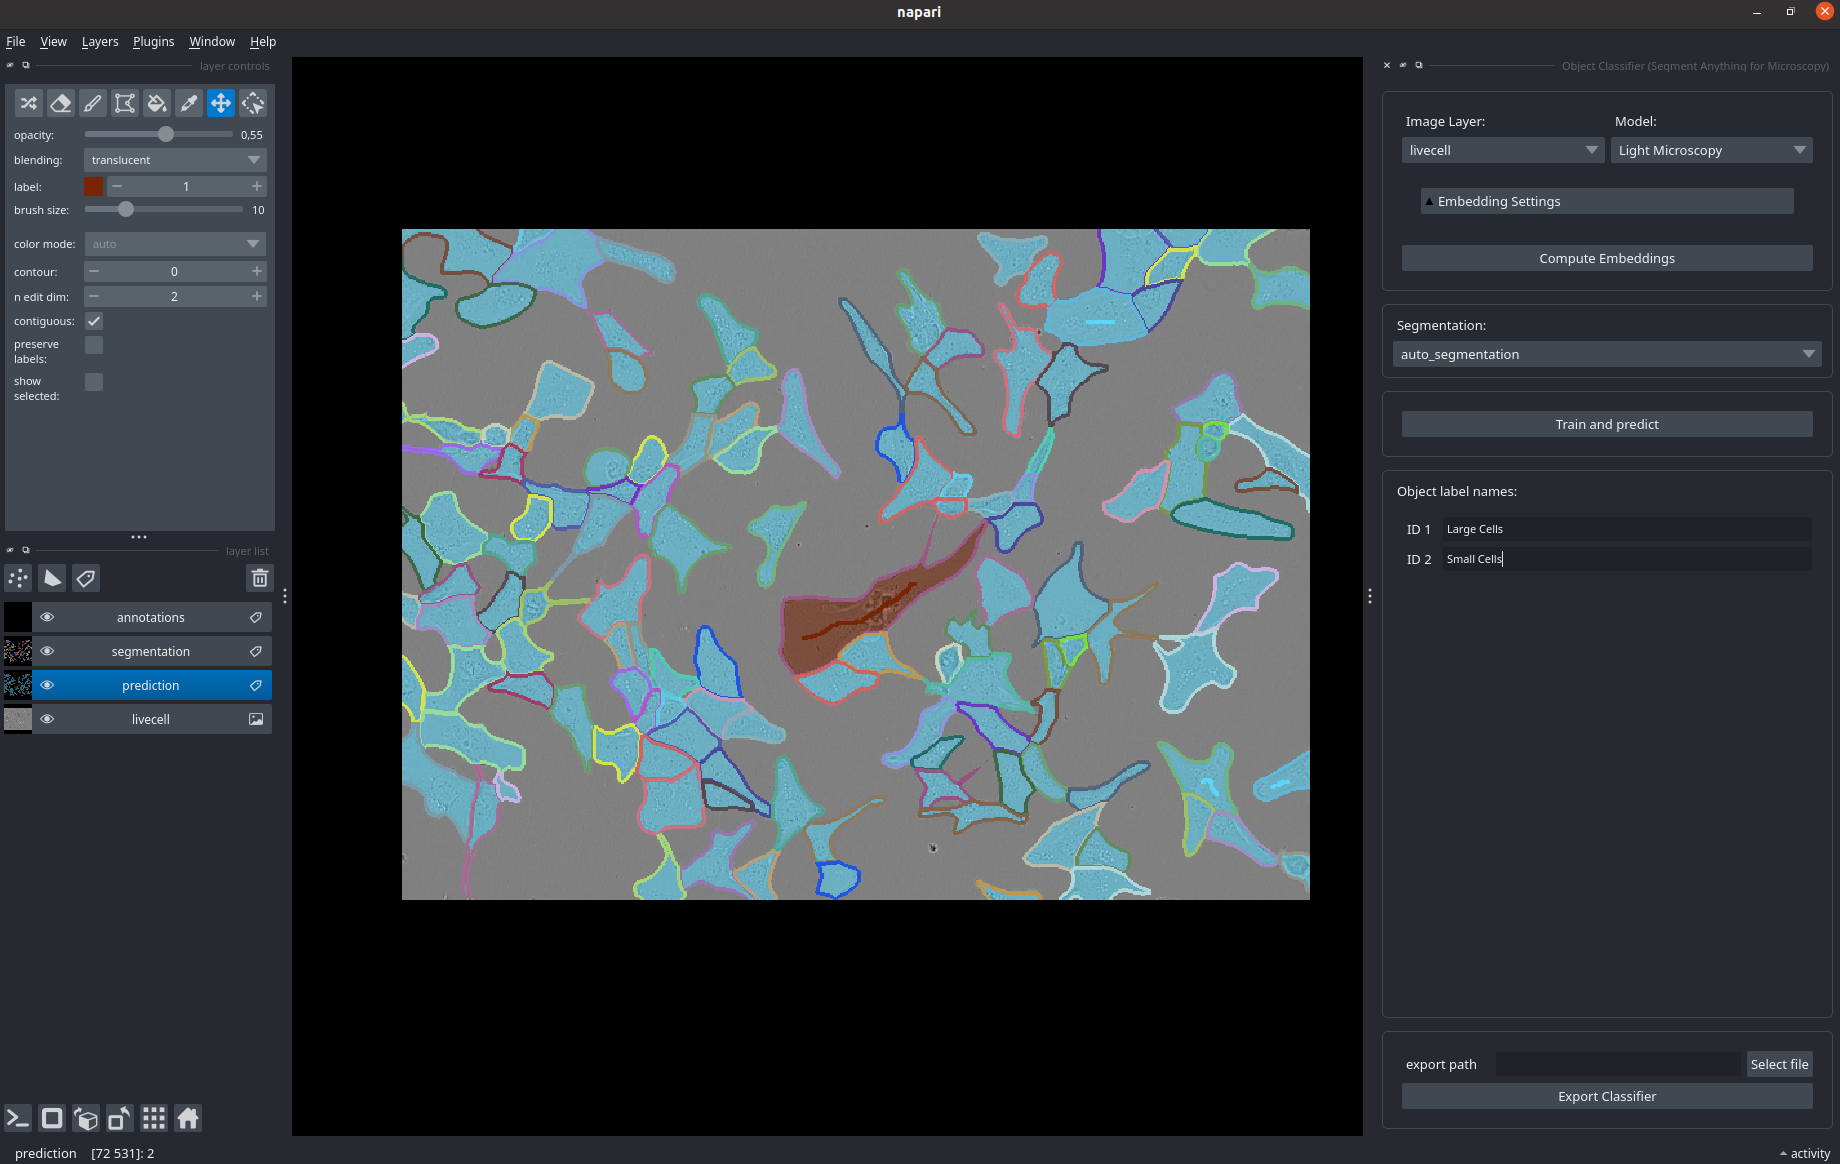
You can load an image (here: livecell) and a segmentation (here, segmentation, for example from another micro_sam widget).
Compute image embeddings as in the other widgets.
Then, draw annotations for the different types of objects in your image in the annotation layer, see also the brushstroke labels visible in some cells in the image.
By clicking Train and predict you train a random forest classifer on the objects you have annotated, that uses the image embeddings projected to the objects as features.
It is then applied to all objects to obtain the semantic segmentation shown in prediction.
This workflow is still experimental. It may significantly change in the future and we are working on a publication to explain the underlying methodology and to document it properly. Feedback is already welcome in case you use it.
Finetuning UI
We also provide a graphical inferface for fine-tuning models on your own data. It can be started by clicking Finetuning in the plugin menu after starting napari.
Note: if you know a bit of python programming we recommend to use a script for model finetuning instead. This will give you more options to configure the training. See these instructions for details.
When starting this tool via the plugin menu the following interface opens:
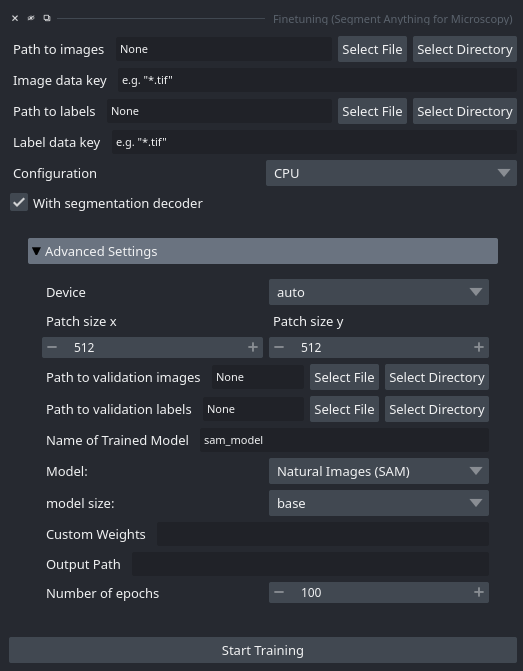
You can select the image data via Path to images. You can either load images from a folder or select a single image file. By providing Image data key you can either provide a pattern for selecting files from the folder or provide an internal filepath for HDF5, Zarr or similar fileformats.
You can select the label data via Path to labels and Label data key, following the same logic as for the image data. The label masks are expected to have the same size as the image data. You can for example use annotations created with one of the micro_sam annotation tools for this, they are stored in the correct format. See the FAQ for more details on the expected label data.
The Configuration option allows you to choose the hardware configuration for training. We try to automatically select the correct setting for your system, but it can also be changed. Details on the configurations can be found here.
NOTE: We recommend to fine-tune Segment Anything models on your data by
- running
$ micro_sam.trainin the command line. - calling
micro_sam.training.train_samin a python script. Check out examples/finetuning/finetune_hela.py OR notebooks/sam_finetuning.ipynb for details.
Using the Command Line Interface (CLI)
micro-sam extends access to a bunch of functionalities using the command line interface (CLI) scripts via terminal.
The supported CLIs can be used by
- Running
$ micro_sam.infofor gettingmicro-sampackage information and other necessary system-level information to usemicro-sam. - Running
$ micro_sam.precompute_embeddingsfor precomputing and caching the image embeddings. - Running
$ micro_sam.annotator_2dfor starting the 2d annotator. - Running
$ micro_sam.annotator_3dfor starting the 3d annotator. - Running
$ micro_sam.annotator_trackingfor starting the tracking annotator. - Running
$ micro_sam.image_series_annotatorfor starting the image series annotator. - Running
$ micro_sam.trainfor finetuning Segment Anything models on your data. - Running
$ micro_sam.automatic_segmentationfor automatic instance segmentation.- We support all post-processing parameters for automatic instance segmentation (for AMG, AIS and APG).
- The automatic segmentation mode can be controlled by:
--mode <MODE_NAME>, where the available choice forMODE_NAMEisamg/ais/apg. - AMG is supported by both default Segment Anything models and
micro-sammodels / finetuned models. - AIS is supported by
micro-sammodels (or finetuned models; subjected to they are trained with the additional instance segmentation decoder) - APG is supported by
micro-sammodels (or finetuned models; subjected to they are trained with the additional instance segmentation decoder)
- The automatic segmentation mode can be controlled by:
- If these parameters are not provided by the user,
micro-sammakes use of the best post-processing parameters (depending on the choice of model). - The post-processing parameters can be changed by parsing the parameters via the CLI using
--<PARAMETER_NAME> <VALUE>.For example, one can update the parameter values (eg.pred_iou_thresh,stability_iou_thresh, etc. - supported by AMG) using$ micro_sam.automatic_segmentation ... --pred_iou_thresh 0.6 --stability_iou_thresh 0.6 ...- Remember to specify the automatic segmentation mode using
--mode <MODE_NAME>when using additional post-processing parameters.
- Remember to specify the automatic segmentation mode using
- You can check details for supported parameters and their respective default values at
micro_sam/instance_segmentation.pyunder thegeneratemethod forAutomaticMaskGenerator,InstanceSegmentationWithDecoderandAutomaticPromptGeneratorclass. - A good practice is to set
--ndim <NDIM>, where<NDIM>corresponds to the number of dimensions of input images.
- We support all post-processing parameters for automatic instance segmentation (for AMG, AIS and APG).
- Running
$ micro_sam.evaluatefor evaluating instance segmentation.
NOTE: For all CLIs above, you can find more details by adding the argument -h to the CLI script (eg. $ micro_sam.annotator_2d -h).
Using the Python Library
The python library can be imported via
import micro_sam
This library extends the Segment Anything library and
- implements functions to apply Segment Anything to 2d and 3d data in
micro_sam.prompt_based_segmentation. - provides improved automatic instance segmentation functionality in
micro_sam.instance_segmentation. - implements training functionality that can be used for finetuning Segment Anything on your own data in
micro_sam.training. - provides functionality for quantitative and qualitative evaluation of Segment Anything models in
micro_sam.evaluation.
You can import these sub-modules via
import micro_sam.prompt_based_segmentation
import micro_sam.instance_segmentation
# etc.
This functionality is used to implement the interactive annotation tools in micro_sam.sam_annotator and can be used as a standalone python library.
We provide jupyter notebooks that demonstrate how to use it here. You can find the full library documentation by scrolling to the end of this page.
Training your Own Model
We reimplement the training logic described in the Segment Anything publication to enable finetuning on custom data. We use this functionality to provide the finetuned microscopy models and it can also be used to train models on your own data. In fact the best results can be expected when finetuning on your own data, and we found that it does not require much annotated training data to get significant improvements in model performance. So a good strategy is to annotate a few images with one of the provided models using our interactive annotation tools and, if the model is not working as good as required for your use-case, finetune on the annotated data. We recommend checking out our paper for details on the results on how much data is required for finetuning Segment Anything.
The training logic is implemented in micro_sam.training and is based on torch-em. Check out the finetuning notebook to see how to use it, or the training CLI (micro_sam.train), see micro_sam.train -h for details on how to use it.
We also support training an additional decoder for automatic instance segmentation. This yields better results than the automatic mask generation of segment anything and is significantly faster.
The notebook explains how to train it together with the rest of SAM and how to then use it.
More advanced examples, including quantitative and qualitative evaluation, can be found in the finetuning directory, which contains the code for training and evaluating our models. You can find further information on model training in the FAQ section.
Here is a list of resources, together with their recommended training settings, for which we have tested model finetuning:
| Resource Name | Capacity | Model Type | Batch Size | Finetuned Parts | Number of Objects |
|---|---|---|---|---|---|
| CPU | 32GB | ViT Base | 1 | all | 10 |
| CPU | 64GB | ViT Base | 1 | all | 15 |
| GPU (NVIDIA GTX 1080Ti) | 8GB | ViT Base | 1 | Mask Decoder, Prompt Encoder | 10 |
| GPU (NVIDIA Quadro RTX5000) | 16GB | ViT Base | 1 | all | 10 |
| GPU (Tesla V100) | 32GB | ViT Base | 1 | all | 10 |
| GPU (NVIDIA A100) | 80GB | ViT Tiny | 2 | all | 50 |
| GPU (NVIDIA A100) | 80GB | ViT Base | 2 | all | 40 |
| GPU (NVIDIA A100) | 80GB | ViT Large | 2 | all | 30 |
| GPU (NVIDIA A100) | 80GB | ViT Huge | 2 | all | 25 |
NOTE: If you use the finetuning UI or the training CLI (
micro_sam.train) ormicro_sam.training.training.train_sam_for_configuration, you can specify the hardware configuration and the best settings for it will be set automatically. If your hardware is not in the settings we have tested choose the closest match. You can set the training parameters yourself when usingmicro_sam.training.training.train_sam. Be aware that the choice for the number of objects per image, the batch size, and the type of model have a strong impact on the VRAM needed for training and the duration of training. See the finetuning notebook for an overview of these parameters.
Finetuned Models
In addition to the original Segment Anything models, we provide models that are finetuned on microscopy data, histopathology data and medical imaging. They are available in the BioImage.IO Model Zoo and are also hosted on Zenodo.
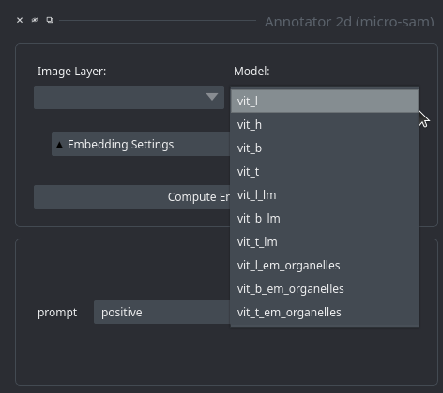
In the annotation tools, you can select the model from the top widget:

You can use the Model dropdown (left side) to select which kind of model to use and the model size dropdown (right side, available after opening the Embedding Settings menu) to select the size of the model.
By default, the base size is used.
If you are using the CLI or the python library, then you can specify the model to use via the model_type parameter, which consists of a single name composed of model type and size. See for example the 2d annotator example.
Specifically, we provide the following model types and sizes:
- The original Segment Anything Models (
Natural Images (SAM)):vit_h: Segment Anything model with ViT Huge image encoder.vit_l: Segment Anything model with ViT Large image encoder.vit_b: Segment Anything model with ViT Base image encoder.vit_t: Segment Anything model with ViT Tiny image encoder. From Mobile SAM.
- The light microscopy generalist models from Segment Anything for Microscopy (
Light Microscopy).vit_l_lm: Model for cells and nuclei in light microscopy data with ViT Large image encoder. (idealistic-rat on BioImage.IO)vit_b_lm: Model for cells and nuclei in light microscopy data with ViT Base image encoder. (diplomatic-bug on BioImage.IO)vit_t_lm: Model for cells and nuclei in light microscopy data with ViT Tiny image encoder. (faithful-chicken BioImage.IO)
- The electron microscopy generalist models from Segment Anything for Microscopy (
Electron Microscopy).vit_l_em_organelles: Model for mitochodria and nuclei in electron microscopy data with ViT Large image encoder. (humorous-crab on BioImage.IO)vit_b_em_organelles: Model for mitochodria and nuclei in electron microscopy data with ViT Base image encoder. (noisy-ox on BioImage.IO)vit_t_em_organelles: Model for mitochodria and nuclei in electron microscopy data with ViT Tiny image encoder. (greedy-whale on BioImage.IO)
- The medical imaging generalist models from MedicoSAM (
Medical Imaging).vit_b_medical_imaging: Model for medical imaging data with ViT Base image encoder.
- The histopathology generalist models from PathoSAM (
Histopathology).vit_h_histopathology: Model for nuclei in histopathology with ViT Huge image encoder.vit_l_histopathology: Model for nuclei in histopathology with ViT Large image encoder.vit_b_histopathology: Model for nuclei in histopathology with ViT Base image encoder.
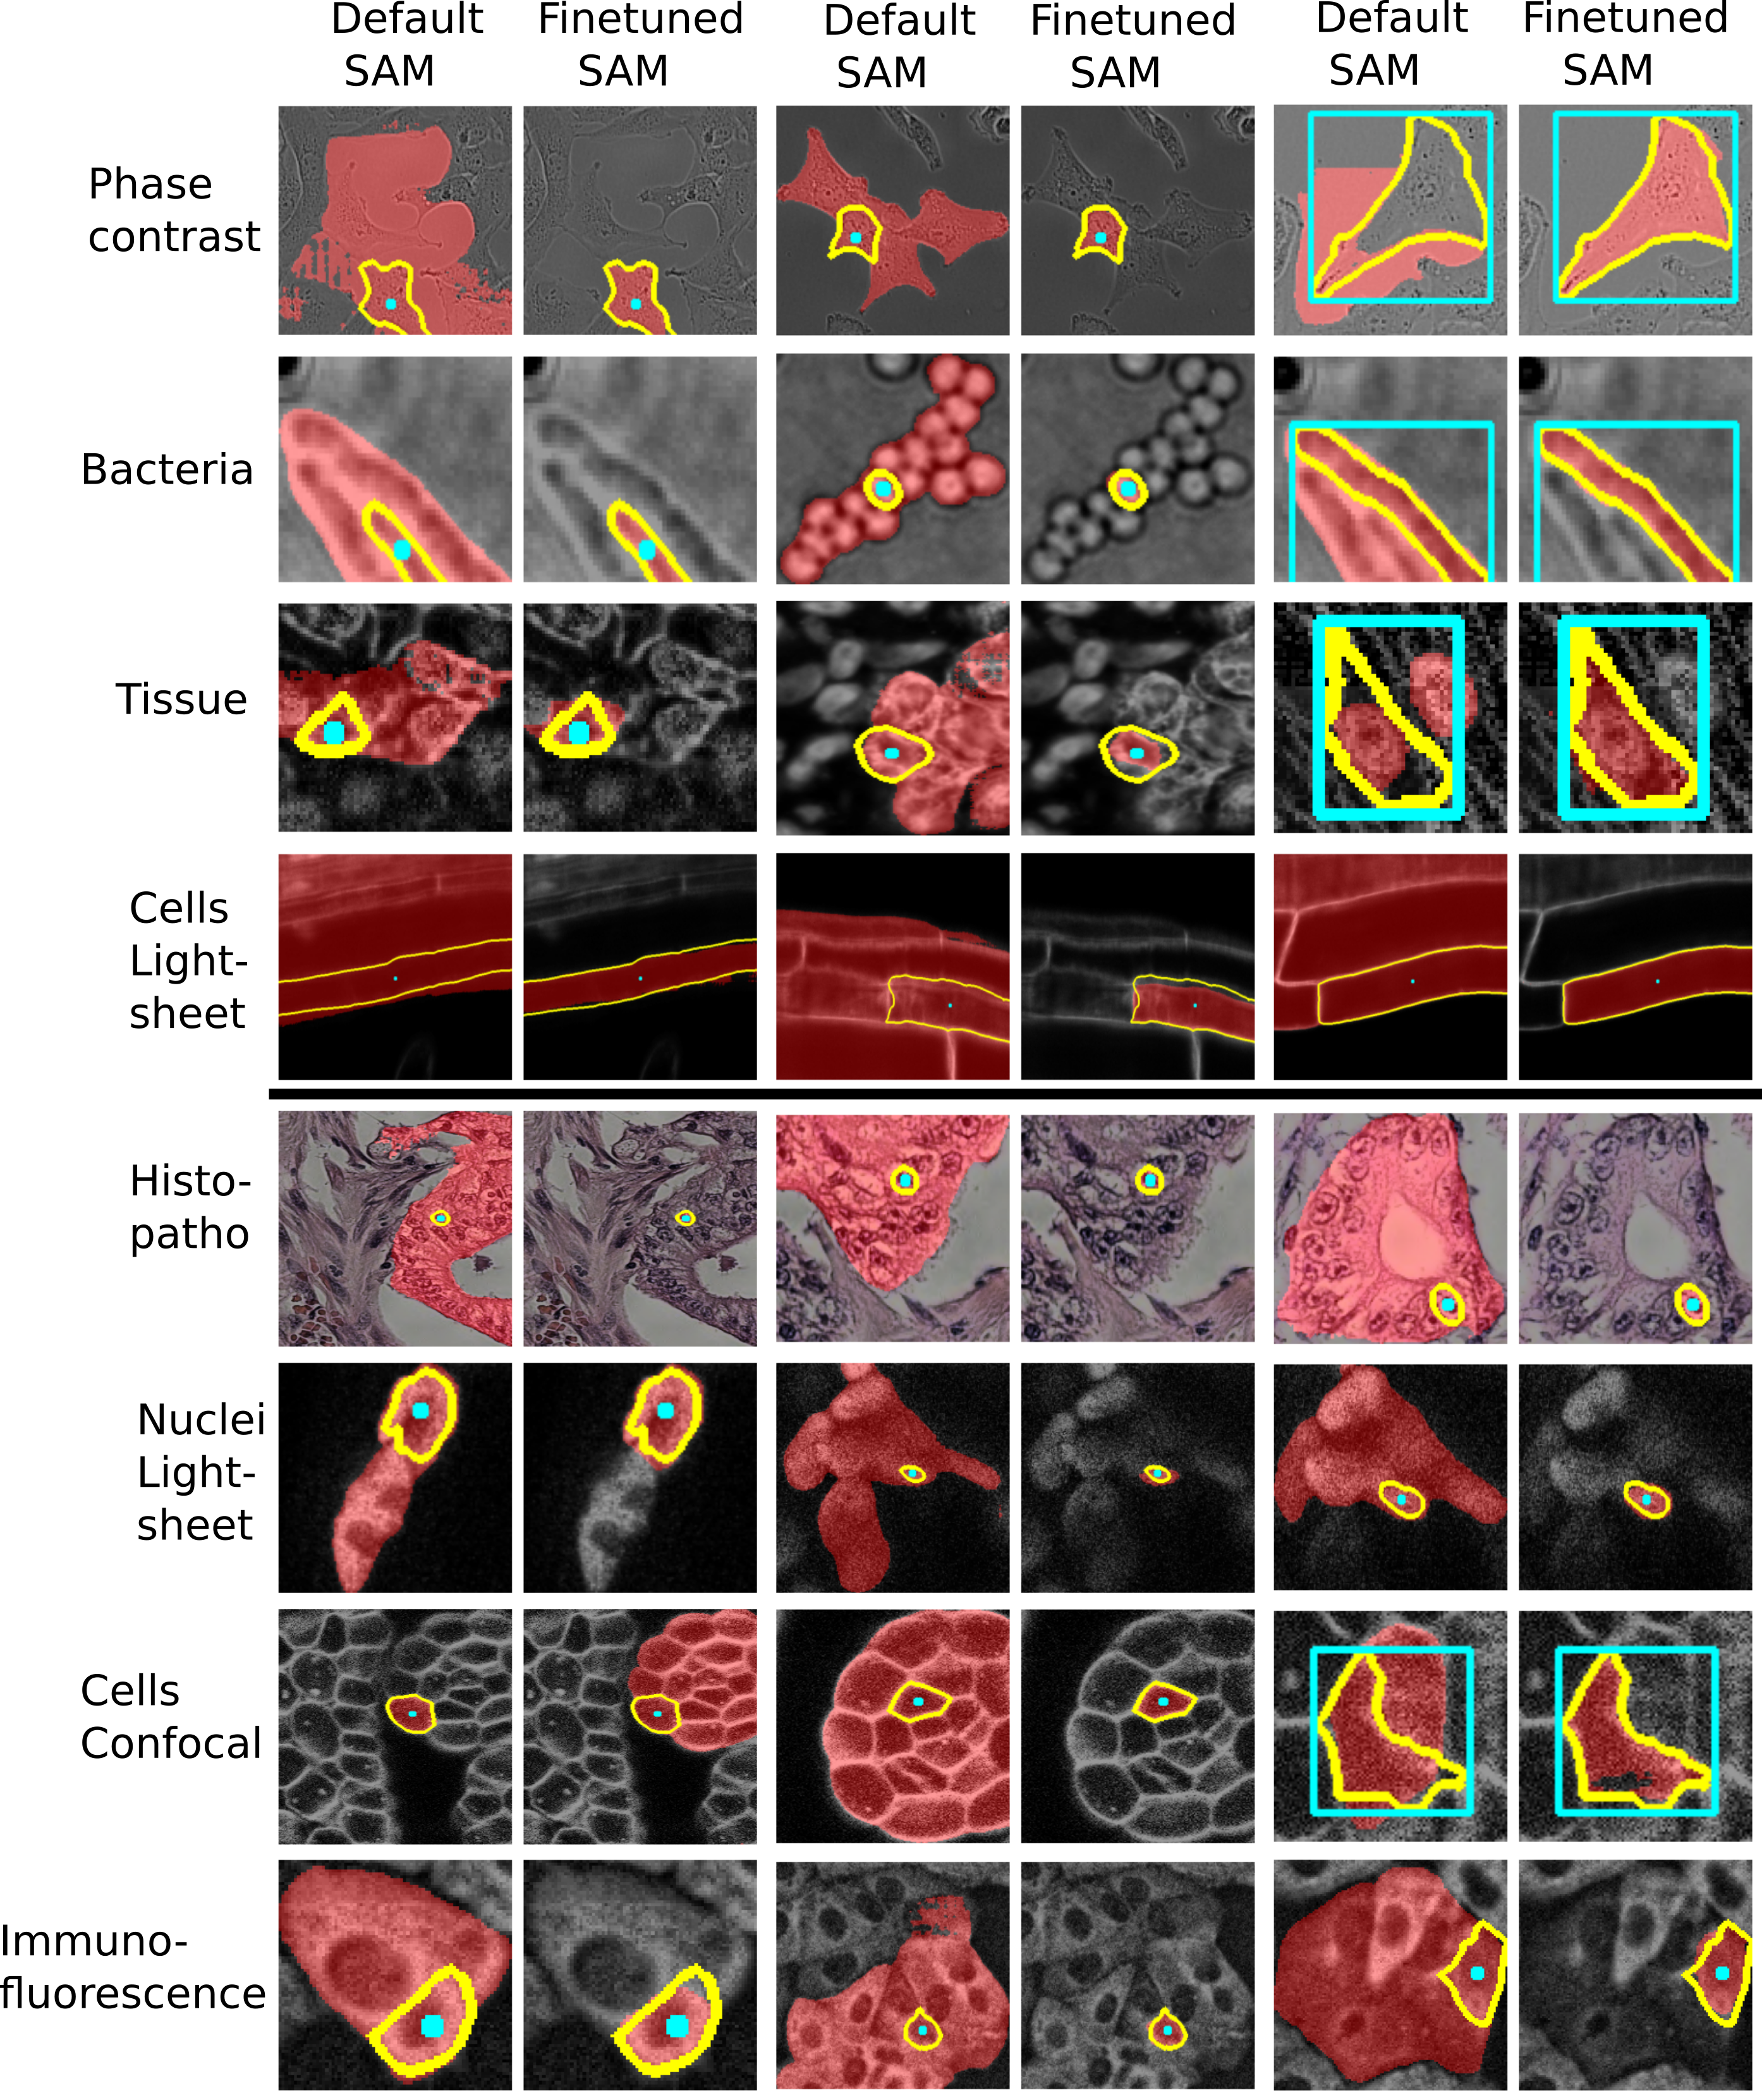
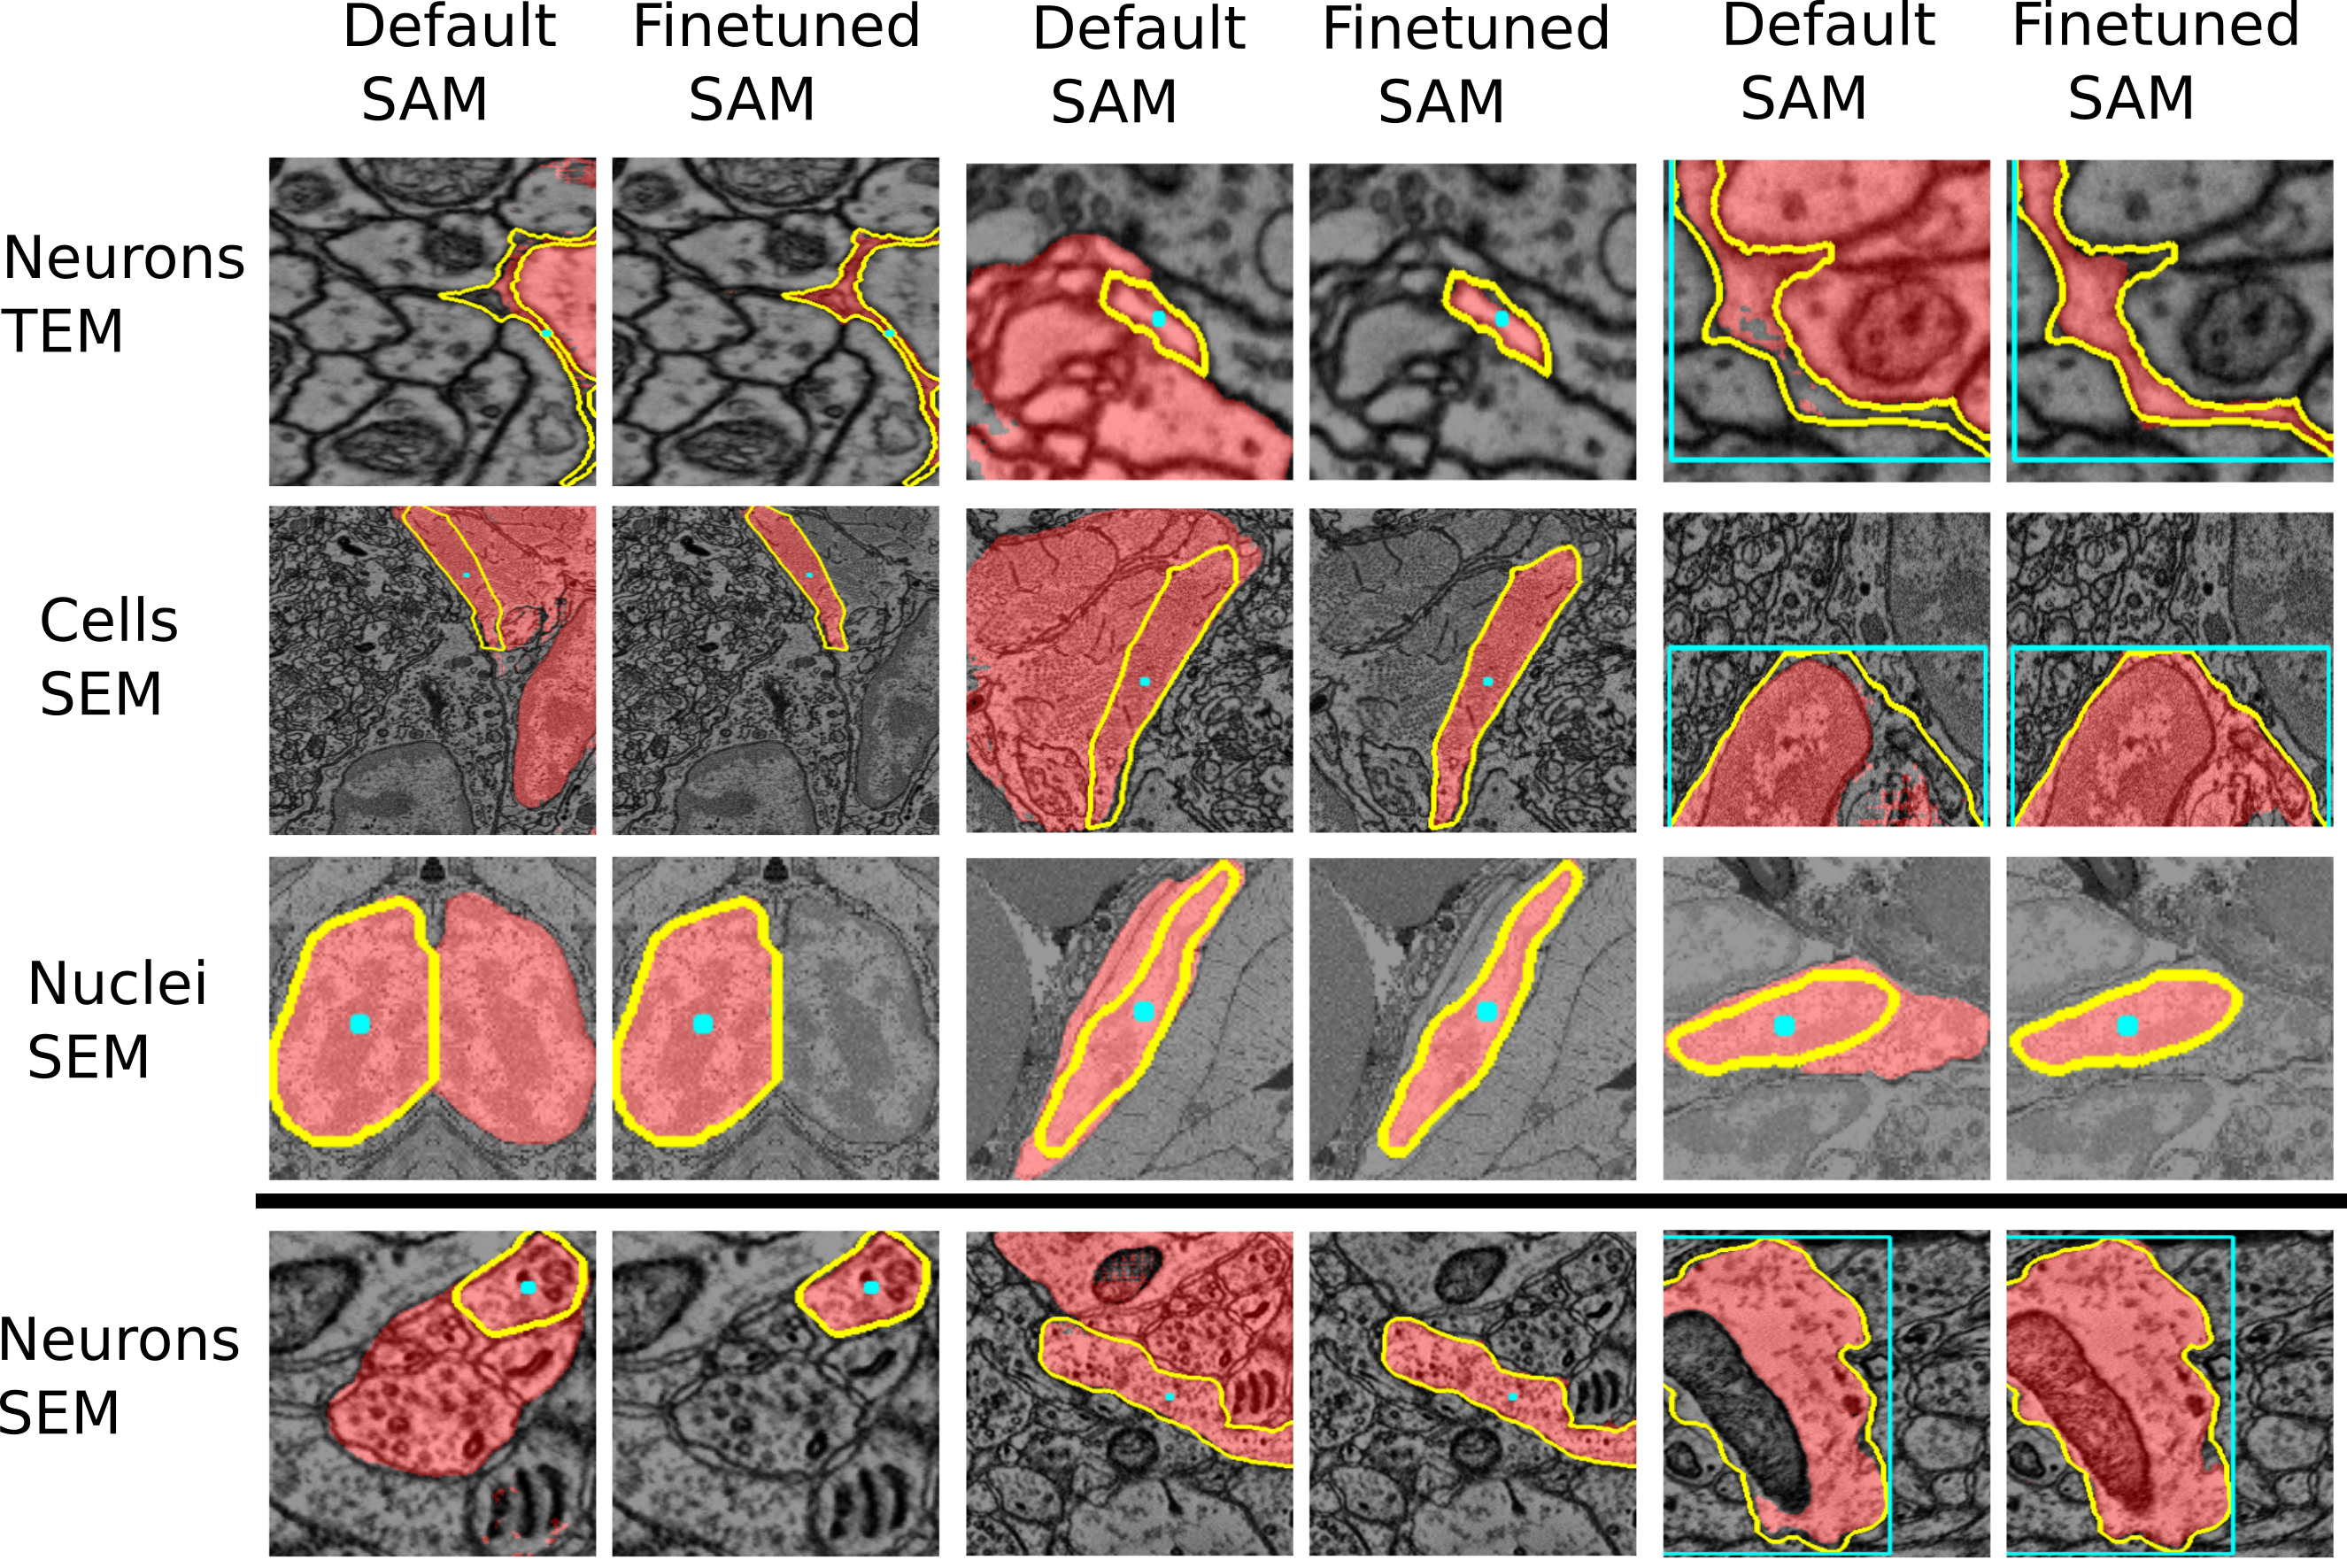
See the two figures below of the improvements through the finetuned models for LM and EM data.
Note: if you have a micro_sam version older than v1.4.0, then the model selection dialogue in the annotation tools looks differently. In these versions, you have to select the model by its full name:
Choosing a Model
As a rule of thumb:
- Use the
Light Microscopymodel (vit_b_lm) for segmenting cells or nuclei in light microscopy. The larger model (vit_l_lm) yields a bit better segmentation quality, especially for automatic segmentation, but needs more computational resources. - Use the
Electron Microscopymodels (vit_b_em_organellesorvit_l_em_organelles) for segmenting mitochondria, nuclei or other roundish organelles in electron microscopy. - Use the
Medical Imagingmodel (vit_b_medical_imaging) for interactive segmentation of medical imaging data (X-Ray, CT, MRI, Ultrasound, etc.). - Use the
Histopathologymodels (vit_b_histopathologyorvit_l_histopathology) for segmenting nuclei in histopathology images. - For other use-cases, use one of the original SAM models (
SAM (Natural Images),vit_borvit_l). - We have not seen any advantages of using the largest model (
vit_h), so in general don't recommend to use it as it needs significantly more resources to run. - The
vit_t_...models run much faster than other models, but yield inferior quality for many applications. It can still make sense to try them for your use-case if your working on a laptop and want to annotate many images or volumetric data.
See also the figures above for examples where the finetuned models work better than the default models. We are working on further improving these models and adding new models for other biomedical imaging domains.
Other Models
Previous versions of our models are available on Zenodo or on the BioImage.IO modelzoo:
v3 Models
An improved version of the light microscopy that were trained on a larger dataset compared to the v2 light microscopy models:
- vit_t_lm: the ViT-Tiny model for segmenting cells and nuclei in LM.
- vit_b_lm: the ViT-Base model for segmenting cells and nuclei in LM.
- vit_l_lm: the ViT-Large model for segmenting cells and nuclei in LM.
v2 Models
The models at the point of the publication. The results reported in the paper refer to these models:
- vit_t_lm: the ViT-Tiny model for segmenting cells and nuclei in LM.
- vit_b_lm: the ViT-Base model for segmenting cells and nuclei in LM.
- vit_l_lm: the ViT-Large model for segmenting cells and nuclei in LM.
- vit_t_em_organelles: the ViT-Base model for segmenting mitochondria and nuclei in EM.
- vit_b_em_organelles: the ViT-Base model for segmenting mitochondria and nuclei in EM.
- vit_l_em_organelles: the ViT-Large model for segmenting mitochondria and nuclei in EM.
v1 Models
The initial models published with our preprint:
- vit_b_em_boundaries: for segmenting compartments delineated by boundaries such as cells or neurites in EM.
- vit_b_em_organelles: for segmenting mitochondria, nuclei or other organelles in EM.
- vit_b_lm: for segmenting cells and nuclei in LM.
- vit_h_em: for general EM segmentation.
- vit_h_lm: for general LM segmentation.
We do not recommend to use these models since our new models improve upon them significantly. But we provide the links here in case they are needed to reproduce older segmentation workflows.
We provide additional models that were used for experiments in our publication on Zenodo:
- LIVECell Specialist Models
- TissueNet Specialist Models
- NeurIPS CellSeg Specialist Models
- DeepBacs Specialist Models
- PlantSeg (Root) Specialist Models
- CREMI Specialist Models
- ASEM (ER) Specialist Models
- The LM Generalist Model with ViT-H backend (vit_h_lm)
- The EM Generalist Model with ViT-H backend (vit_h_em_organelles)
- Finetuned Models for the user studies
APG
micro_sam supports three different modes for instance segmentation:
- Automatic Mask Generation (AMG) covers the image with a grid of points. These points are used as prompts and the resulting masks are merged via non-maximum suppression (NMS) to obtain the instance segmentation. This method has been introduced by the original SAM publication.
- Automatic Instance Segmentation (AIS) uses an additional segmentation decoder, which we introduced in the
micro_sampublication. This decoder predicts foreground probabilities as well as the normalized distances to cell centroids and boundaries. These predictions are used as input to a waterhsed to obtain the instances. - Automatic Prompt Generation (APG) is an instance segmentation approach that we introduced in a new paper. It derives point prompts from the segmentation decoder (see AIS) and merges the resulting masks via NMS.
In our experiments, APG yields the best overall instance segmentation results (compared to AMG and AIS) and is competitive with CellPose-SAM, the state-of-the-art model for cell instance segmentation.
The segmentation mode can be selected with the argument mode or segmentation_mode in the CLI and python functionality. For details on how to use the different automatic segmentation modes check out the automatic segmentation
notebook. The code for the experiments comparing the different segmentation modes (from the new paper) can be found here.
Community Data Submissions
We are looking to further improve the micro_sam models by training on more diverse microscopy data.
For this, we want to collect data where the models don't work well yet, and need your help!
If you are using micro_sam for a task where the current models don't do a good job, but you have annotated data and successfully fine-tuned a model, then you can submit this data to us, so that we can use it to train our next version of improved microscopy models.
To do this, please either create an issue on github or a post on image.sc and:
- Use a title "Data submission for micro_sam: ..." ("..." should be a title for your data, e.g. "cells in brightfield microscopy")
- On image.sc use the tag
micro-sam.
- On image.sc use the tag
- Briefly describe your data and add an image that shows the microscopy data and the segmentation masks you have.
- Make sure to describe:
- The imaging modality and the structure(s) that you have segmented.
- The
micro_sammodel you have used for finetuning and segmenting the data.- You can also submit data that was not segmented with
micro_sam, as long as you have sufficient annotations we are happy to include it!
- You can also submit data that was not segmented with
- How many images and annotations you have / can submit and how you have created the annotations.
- You should submit at least 5 images / 100 annotated objects to have a meaningful impact. If you are unsure if you have enough data please go ahead and create the issue / post and we can discuss the details.
- Which data-format your images and annotations are stored in. We recommend using either
tifimages orome.zarrfiles.
- Please indicate that you are willing to share the data for training purpose (see also next paragraph).
Once you have created the post / issue, we will check if your data is suitable for submission or discuss with you how it could be extended to be suitable. Then:
- We will share an agreement for data sharing. You can find a draft here.
- You will be able to choose how you want to submit / publish your data.
- Share it under a CC0 license. In this case, we will use the data for re-training and also make it publicly available as soon as the next model versions become available.
- Share it for training with the option to publish it later. For example, if your data is unpublished and you want to only published once the respective publication is available. In this case, we will use the data for re-training, but not make it freely available yet. We will check with you peridiodically to see if your data can now be published.
- Share it for training only. In this case, we will re-train the model on it, but not make it publicly available.
- We encourage you to choose the first option (making the data available under CC0).
- We will then send you a link to upload your data, after you have agreed to these terms.
FAQ
Here we provide frequently asked questions and common issues.
If you encounter a problem or question not addressed here feel free to open an issue or to ask your question on image.sc with the tag micro-sam.
Installation questions
0. I am not familiar with conda / mamba / micromamba and would like to get started with a python package manager.
If you are getting started from scratch, we recommend using micromamba to setup your own package manager and creating a new environment with the required dependencies. You can install micromamba by following the instructions here under the Automatic install section. If you are using Linux, macOS, or Git Bash on Windows, the simplest way to of installing micromamba is to simply execute the installation script below in your preferred shell:
"${SHELL}" <(curl -L micro.mamba.pm/install.sh)
If you are using Windows PowerShell, you should be able to install micromamba by running the following command:
Invoke-Expression ((Invoke-WebRequest -Uri https://micro.mamba.pm/install.ps1 -UseBasicParsing).Content)
Once you have micromamba installed, you can create a new environment with the required dependencies by following the installation instructions for micro_sam (remember to replace conda by micromamba in the installation commands. For example: to check the list of available environments, conda env list becomes micromamba env list).
If you have any troubles in the aforementioned steps, remember to first check the official documentation for troubleshooting details.
1. How to install micro_sam?
The installation for micro_sam is supported in four ways: from pip, from conda, from source, and from installers.
We recommend installation from pip or conda for most users.
Check out our tutorial video to get started with micro_sam, briefly walking you through the installation process and how to start the tool.
2. I cannot install micro_sam using the installer, I am getting some errors.
The installer should work out-of-the-box on Windows and Linux platforms. Please open an issue to report the error you encounter.
NOTE: The installers enable using
micro_samwithout conda. However, we recommend the installation from pip, from conda, or from source to use all its features seamlessly. Specifically, the installers are out-of-date and currently only support the CPU and won't enable you to use the GPU (if you have one).
3. What is the minimum system requirement for micro_sam?
From our experience, the micro_sam annotation tools work seamlessly on most laptop or workstation CPUs and with > 8GB RAM.
You might encounter some slowness for >= 8GB RAM. The resources micro_sam's annotation tools have been tested on are:
- Windows:
- Windows 10 Pro, Intel i5 7th Gen, 8GB RAM
- Windows 10 Enterprise LTSC, Intel i7 13th Gen, 32GB RAM
- Windows 10 Pro for Workstations, Intel Xeon W-2295, 128GB RAM
Linux:
- Ubuntu 20.04, Intel i7 11th Gen, 32GB RAM
- Ubuntu 22.04, Intel i7 12th Gen, 32GB RAM
Mac:
- macOS Sonoma 14.4.1
- M1 Chip, 8GB RAM
- M3 Max Chip, 36GB RAM
- macOS Sonoma 14.4.1
Having a GPU will significantly speed up the annotation tools and especially the model finetuning.
4. What is the recommended PyTorch version?
micro_sam has been tested mostly with CUDA 12.1 and PyTorch [2.1.1, 2.2.0]. However, the tool and the library is not constrained to a specific PyTorch or CUDA version. So it should work fine with the standard PyTorch installation for your system.
5. I am missing a few packages (eg. ModuleNotFoundError: No module named 'elf.io). What should I do?
With the latest release 1.0.0, the installation from conda and source should take care of this and install all the relevant packages for you.
So please reinstall micro_sam, following the installation guide.
6. Can I install micro_sam using pip?
Yes! We recently made available micro_sam with pip. Check out the installation guide for details.
7. I get the following error: importError: cannot import name 'UNETR' from 'torch_em.model'.
It's possible that you have an older version of torch-em installed. Similar errors could often be raised from other libraries, the reasons being: a) Outdated packages installed, or b) Some non-existent module being called. If the source of such error is from micro_sam, then a) is most likely the reason . We recommend installing the latest version following the installation instructions.
8. My system does not have a internet connection. Where should I put the model checkpoints for the micro-sam models?
We recommend transferring the model checkpoints to the system-level cache directory (you can find yours by running the following in terminal: python -c "from micro_sam import util; print(util.microsam_cachedir())). Once you have identified the cache directory, you need to create an additional models directory inside the micro-sam cache directory (if not present already) and move the model checkpoints there. At last, you must rename the transferred checkpoints as per the respective key values in the url dictionaries located in the micro_sam.util.models function (below mentioned is an example for Linux users).
# Download and transfer the model checkpoints for 'vit_b_lm' and `vit_b_lm_decoder`.
# Next, verify the cache directory.
> python -c "from micro_sam import util; print(util.microsam_cachedir())"
/home/anwai/.cache/micro_sam

# Create 'models' folder in the cache directory
> mkdir /home/anwai/.cache/micro_sam/models

# Move the checkpoints to the models directory and rename them
# The following steps transfer and rename the checkpoints to the desired filenames.
> mv vit_b.pt /home/anwai/.cache/micro_sam/models/vit_b_lm
> mv vit_b_decoder.pt /home/anwai/.cache/micro_sam/models/vit_b_lm_decoder
9. napari crashes with a segmentation fault (Fatal Python error: Segmentation fault) when I open one of the micro_sam annotators (Linux).
This is caused by a corrupted or stale system font cache, not by micro_sam itself. Qt segfaults inside fontconfig while laying out text. This shows up in two common variants:
- On launch, before any widget appears, while Qt renders the napari welcome screen. The crash traceback ends in
libfontconfig(e.g.FcCharSetHasChar/FcCharSetFindLeafForward), reached viaQFontEngineMultiFontConfig::shouldLoadFontEngineForCharacterduring font fallback. - After the annotator opens, when the collapsible "Settings" section (from
superqt) draws small arrow glyphs (▲/▼). Here Qt may resolve the default font to an unusable font file (e.g. a.woffweb font) and Qt's bundled FreeType/HarfBuzz segfaults rendering those glyphs. The traceback ends insuperqt/collapsible/_collapsible.pyin_convert_string_to_icon.
Both have the same cause and the same fix. The most reliable fix is to clear the user font cache directory and rebuild it, since a stale cache often holds entries from several fontconfig versions (e.g. *.cache-7, *.cache-10, *.cache-11) that a newer fontconfig then misreads:
rm -rf ~/.cache/fontconfig && fc-cache -f
Rebuilding without clearing (fc-cache -f alone) is sometimes enough for the .woff variant, but is not reliable for the cross-version cache problem. You can verify the fix by checking that the default font no longer resolves to a .woff (or otherwise broken) file:
fc-match "Sans Serif" # should return a real font such as NotoSans-Regular.ttf, not a .woff
10. napari fails to render with RuntimeError: Cannot FRAMEBUFFER object ... because it does not exist or OpenGL.error.Error: Attempt to retrieve context when no valid context (Linux / Wayland).
This is an OpenGL context mismatch, not a micro_sam or napari bug. napari renders points with the vispy gl+ backend, which routes OpenGL calls through PyOpenGL. On a Wayland session PyOpenGL defaults to its EGL backend and looks for the current context with eglGetCurrentContext(). However, when the napari window runs under XWayland (Qt falls back to the xcb platform because the Wayland Qt plugin is missing), the actual OpenGL context is a GLX context, which EGL cannot see. PyOpenGL then reports "no valid context" and the draw fails. The crash only appears once the canvas actually draws (e.g. after opening an image), not on the empty welcome screen.
To fix it, tell PyOpenGL to use the GLX backend so it matches the context Qt created. For a single run:
PYOPENGL_PLATFORM=glx napari
Or set it for the whole shell session and then launch napari:
export PYOPENGL_PLATFORM=glx
napari
To make it permanent for a conda / micromamba environment, add it to an activation script so it is set automatically on every activate:
mkdir -p "$CONDA_PREFIX/etc/conda/activate.d"
echo 'export PYOPENGL_PLATFORM=glx' > "$CONDA_PREFIX/etc/conda/activate.d/pyopengl_platform.sh"
Usage questions
1. I have some microscopy images. Can I use the annotator tool for segmenting them?
Yes, you can use the annotator tool for:
- Segmenting objects in 2d images (using automatic and/or interactive segmentation).
- Segmenting objects in 3d volumes (using automatic and/or interactive segmentation for the entire object(s)).
- Tracking objects over time in time-series data.
- Segmenting objects in a series of 2d / 3d images.
- In addition, you can finetune the Segment Anything /
micro_sammodels on your own microscopy data, in case the provided models do not suffice your needs. One caveat: You need to annotate a few objects before-hand (micro_samhas the potential of improving interactive segmentation with only a few annotated objects) to proceed with the supervised finetuning procedure.
2. Which model should I use for my data?
We currently provide three different kind of models: the default models vit_h, vit_l, vit_b and vit_t; the models for light microscopy vit_l_lm, vit_b_lm and vit_t_lm; the models for electron microscopy vit_l_em_organelles, vit_b_em_organelles and vit_t_em_organelles.
You should first try the model that best fits the segmentation task your interested in, the lm model for cell or nucleus segmentation in light microscopy or the em_organelles model for segmenting nuclei, mitochondria or other roundish organelles in electron microscopy.
If your segmentation problem does not meet these descriptions, or if these models don't work well, you should try one of the default models instead.
The letter after vit denotes the size of the image encoder in SAM, h (huge) being the largest and t (tiny) the smallest. The smaller models are faster but may yield worse results. We recommend to either use a vit_l or vit_b model, they offer the best trade-off between speed and segmentation quality.
You can find more information on model choice here.
3. I have high-resolution microscopy images, micro_sam does not seem to work.
The Segment Anything model expects inputs of shape 1024 x 1024 pixels. Inputs that do not match this size will be internally resized to match it. Hence, applying Segment Anything to a much larger image will often lead to inferior results, or sometimes not work at all. To address this, micro_sam implements tiling: cutting up the input image into tiles of a fixed size (with a fixed overlap) and running Segment Anything for the individual tiles. You can activate tiling with the tile_shape parameter, which determines the size of the inner tile and halo, which determines the size of the additional overlap.
- If you are using the
micro_samannotation tools, you can specify the values for thetile_shapeandhalovia thetile_x,tile_y,halo_xandhalo_yparameters in theEmbedding Settingsdrop-down menu. - If you are using the
micro_samlibrary in a python script, you can pass them as tuples, e.g.tile_shape=(1024, 1024), halo=(256, 256). See also the wholeslide annotator example. - If you are using the command line functionality, you can pass them via the options
--tile_shape 1024 1024 --halo 256 256.
NOTE: It's recommended to choose the
haloso that it is larger than half of the maximal radius of the objects you want to segment.
4. The computation of image embeddings takes very long in napari.
micro_sam pre-computes the image embeddings produced by the vision transformer backbone in Segment Anything, and (optionally) stores them on disc. I fyou are using a CPU, this step can take a while for 3d data or time-series (you will see a progress bar in the command-line interface / on the bottom right of napari). If you have access to a GPU without graphical interface (e.g. via a local computer cluster or a cloud provider), you can also pre-compute the embeddings there and then copy them over to your laptop / local machine to speed this up.
- You can use the command
micro_sam.precompute_embeddingsfor this (it is installed with the rest of the software). You can specify the location of the pre-computed embeddings via theembedding_pathargument. - You can cache the computed embedding in the napari tool (to avoid recomputing the embeddings again) by passing the path to store the embeddings in the
embeddings_save_pathoption in theEmbedding Settingsdrop-down. You can later load the pre-computed image embeddings by entering the path to the stored embeddings there as well.
5. Can I use micro_sam on a CPU?
Most other processing steps are very fast even on a CPU, the automatic segmentation step for the default Segment Anything models (typically called as the "Segment Anything" feature or AMG - Automatic Mask Generation) however takes several minutes without a GPU (depending on the image size). For large volumes and time-series, segmenting an object interactively in 3d / tracking across time can take a couple of seconds with a CPU (it is very fast with a GPU).
HINT: All the tutorial videos have been created on CPU resources.
6. I generated some segmentations from another tool, can I use it as a starting point in micro_sam?
You can save and load the results from the committed_objects layer to correct segmentations you obtained from another tool (e.g. CellPose) or save intermediate annotation results. The results can be saved via File -> Save Selected Layers (s) ... in the napari menu-bar on top (see the tutorial videos for details). They can be loaded again by specifying the corresponding location via the segmentation_result parameter in the CLI or python script (2d and 3d segmentation).
If you are using an annotation tool you can load the segmentation you want to edit as segmentation layer and rename it to committed_objects.
7. I am using micro_sam for segmenting objects. I would like to report the steps for reproducability. How can this be done?
The annotation steps and segmentation results can be saved to a Zarr file by providing the commit_path in the commit widget. This file will contain all relevant information to reproduce the segmentation.
NOTE: This feature is still under development and we have not implemented rerunning the segmentation from this file yet. See this issue for details.
8. I want to segment objects with complex structures. Both the default Segment Anything models and the micro_sam generalist models do not work for my data. What should I do?
micro_sam supports interactive annotation using positive and negative point prompts, box prompts and polygon drawing. You can combine multiple types of prompts to improve the segmentation quality. In case the aforementioned suggestions do not work as desired, micro_sam also supports finetuning a model on your data (see the next section on finetuning). We recommend the following: a) Check which of the provided models performs relatively good on your data, b) Choose the best model as the starting point to train your own specialist model for the desired segmentation task.
9. I am using the annotation tool and napari outputs the following error: While emmitting signal ... an error ocurred in callback ... This is not a bug in psygnal. See ... above for details.
These messages occur when an internal error happens in micro_sam. In most cases this is due to inconsistent annotations and you can fix them by clearing the annotations.
We want to remove these errors, so we would be very grateful if you can open an issue and describe the steps you did when encountering it.
10. The objects are not segmented in my 3d data using the interactive annotation tool.
The first thing to check is: a) make sure you are using the latest version of micro_sam (pull the latest commit from main if your installation is from source, or update the installation from conda using conda update micro_sam), and b) try out the steps from the 3d annotation tutorial video to verify if this shows the same behaviour (or the same errors) as you faced. For 3d images, it's important to pass the inputs in the python axis convention, ZYX.
c) try using a different model and change the projection mode for 3d segmentation. This is also explained in the video.
11. I have very small or fine-grained structures in my high-resolution microscopic images. Can I use micro_sam to annotate them?
Segment Anything does not work well for very small or fine-grained objects (e.g. filaments). In these cases, you could try to use tiling to improve results (see Point 3 above for details).
12. napari seems to be very slow for large images.
Editing (drawing / erasing) very large 2d images or 3d volumes is known to be slow at the moment, as the objects in the layers are stored in-memory. See the related issue.
13. While computing the embeddings (and / or automatic segmentation), a window stating: "napari" is not responding pops up.
This can happen for long running computations. You just need to wait a bit longer and the computation will finish.
14. I have 3D RGB microscopy volumes. How does micro_sam handle these images?
micro_sam performs automatic segmentation in 3D volumes by first segmenting slices individually in 2D and merging the segmentations across 3D based on overlap of objects between slices. The expected shape of your 3D RGB volume should be (Z * Y * X * 3) (reason: Segment Anything is devised to consider 3-channel inputs, so while the user provides micro-sam with 1-channel inputs, we handle this by triplicating this to fit the requirement, or with 3-channel inputs, we use them in the expected RGB array structures as it is).
15. I want to use a model stored in a different directory than the micro_sam cache. How can I do this?
The micro-sam CLIs for precomputation of image embeddings and annotators (Annotator 2d, Annotator 3d, Annotator Tracking, Image Series Annotator) accept the argument -c / --checkpoint to pass model checkpoints. If you start a micro-sam annotator from the napari plugin menu, you can provide the path to model checkpoints in the annotator widget (on right) under Embedding Settings drop-down in the custom weights path option.
NOTE: It is important to choose the correct model type when you opt for the above recommendation, using the -m / --model_type argument or selecting it from the Model dropdown in Embedding Settings respectively. Otherwise you will face parameter mismatch issues.
16. Some parameters in the annotator / finetuning widget are unclear to me.
micro-sam has tooltips for menu options across all widgets (i.e. an information window will appear if you hover over name of the menu), which briefly describe the utility of the specific menu option.
17. I want to use an older version of the pretrained models.
The older model versions are still available on zenodo. You can find the download links for all of them here. You can then use those models with the custom checkpoint option, see answer 15 for details.
18. I would like to evaluate the instance segmentation quantitatively. Can you suggest how to do that?
micro-sam supports a micro_sam.evaluate CLI, which computes the mean segmentation accuracy (introduced in the Pascal VOC challenge) of the predicted instance segmentation with the corresponding ground-truth annotations. Please see our paper (Methods -> Inference and Evaluation for more details about it) and $ micro_sam.evaluate -h for more details about the evaluation CLI.
19. I get RuntimeError: GET was unable to find an engine to execute this computation on a V100 GPU ("or any older GPU").
This is a known issue for a combination of older generation GPUs (eg. V100s) and pytorch compiled with the latest CUDA Toolkit (eg. CUDA 12.9 and PyTorch 2.8 has been tested to throw this error on V100s). Here's what you can do to solve this issue:
- Use a PyTorch/CUDA build that is known to work with V100, for example CUDA 12.1 or 11.8 with a compatible PyTorch version (please check your installed CUDA drivers).
- Run on CPU (slower, but works).
20. The automatic instance segmentation does a very poor job for my microscopy images.
This can have multiple reasons that you can address by choosing the best settings for your image:
- First, choose the most suitable model for your image type and segmentation task:
vit_b_lmfor any cell or nucleus segmentation task in light microscopy or related tasks such as segmentation of organoids or similar structures.vit_b_em_organellesfor segmenting mitochondria or nuclei in electron microscopy. Note: this model does not yet support other organelles.vit_b_histopathologyfor segmenting nuclei in H&E stained images or other typical image data from histopathology.
- If you have multi-channel images then you have to pass those in a format and channel order compatible with
micro_sam:- If your image has 2 or 3 channels you can use it as is. The channels must be given in the last axis.
- If you have images with a fluorescent marker staining the cytosol or membrane and another marker staining the nucleus, then pass the cytosol/membrane maker as first channel and the nucleus marker as second channel.
- If you have more than 3 channels then you have to reduce the number of channels to 3, either by selecting the most relevant channels (see previous item) or by averaging or otherwise combining channels in a suitable fashion.
- If your image has 2 or 3 channels you can use it as is. The channels must be given in the last axis.
- If you have large images (>~ 700 x 700 pixels) you should activate tiling by passing the
tile_shapeandhaloparameters (if you use CLI or python) or by settingtile_x/tile_y,halo_x/halo_yin theAdvanced Settingsof theEmbedding Widget(if you use the napari tool).- The recommended values for tile shape and halo are
(384, 384)and(64, 64), respectively.
- The recommended values for tile shape and halo are
- If your image contains very small objects that you want to segment then decrease the minimum object size by passing a low value (e.g. 10) for
min_sizeto the CLI / python function you are using or by setting it in theAutomatic Segmentation Settingsof the instance segmentation widget.
If none of these steps help then the available micro_sam models are likely not well suited for your data. Note that you can still use micro_sam for your segmentation problem, but you will have to fine-tune your own model (see the next section).
Fine-tuning questions
1. I have a microscopy dataset I would like to fine-tune Segment Anything for. Is it possible using micro_sam?
Yes, you can fine-tune Segment Anything on your own dataset. Here's how you can do it:
- Check out the tutorial notebook on how to fine-tune Segment Anything with our
micro_sam.traininglibrary. - Or check the examples for additional scripts that demonstrate finetuning.
- If you are not familiar with coding in python at all then you can also use the graphical interface for finetuning. But we recommend using a script for more flexibility and reproducibility.
2. I would like to fine-tune Segment Anything on open-source cloud services (e.g. Kaggle Notebooks), is it possible?
Yes, you can fine-tune Segment Anything on your custom datasets on Kaggle (and BAND). Check out our tutorial notebook for this.
3. What kind of annotations do I need to finetune Segment Anything?
Annotations are referred to the instance segmentation labels, i.e. each object of interests in your microscopy images have an individual id to uniquely identify all the segmented objects. You can obtain them by micro_sam's annotation tools. In micro_sam, it's expected to provide dense segmentations (i.e. all objects per image are annotated) for finetuning Segment Anything with the additional decoder, however it's okay to use sparse segmentations (i.e. few objects per image are annotated) for just finetuning Segment Anything (without the additional decoder).
4. I have finetuned Segment Anything on my microscopy data. How can I use it for annotating new images?
You can load your finetuned model by entering the path to its checkpoint in the custom_weights_path field in the Embedding Settings drop-down menu.
If you are using the python library or CLI you can specify this path with the checkpoint_path parameter.
5. What is the background of the AIS (Automatic Instance Segmentation) feature in micro_sam?
micro_sam introduces a new segmentation decoder to the Segment Anything backbone, for enabling faster and accurate automatic instance segmentation, by predicting the distances to the object center and boundary as well as predicting foreground, and performing seeded watershed-based postprocessing to obtain the instances.
6. What is the background of the new APG (Automatic Prompt Generation) feature in micro_sam?
With the latest version 1.7.0 onwards, micro_sam introduces a new automatic instance segmentation method, called APG (automatic prompt generation). It builds on micro_sam by extracting prompts from the boundary and center distances predicted by the pretrained segmentation decoder. Once the prompts have been derived, it provides them to the prompt encoder and mask decoder (and additional postprocessing to the outputs) to obtain the instances. The method is compatible with the micro_sam.automatic_segmentation CLI (by selecting the segmentation_mode="apg") and the python interface. See APG for details.
7. I want to finetune only the Segment Anything model without the additional instance decoder.
The instance segmentation decoder is optional. So you can only finetune SAM or SAM and the additional decoder. Finetuning with the decoder will increase training times, but will enable you to use AIS and APG. See this example for finetuning with both the objectives.
NOTE: To try out the other way round (i.e. the automatic instance segmentation framework without the interactive capability, i.e. a UNETR: a vision transformer encoder and a convolutional decoder), you can take inspiration from this example on LIVECell.
8. I have a NVIDIA RTX 4090Ti GPU with 24GB VRAM. Can I finetune Segment Anything?
Finetuning Segment Anything is possible in most consumer-grade GPU and CPU resources (but training being a lot slower on the CPU). For the mentioned resource, it should be possible to finetune a ViT Base (also abbreviated as vit_b) by reducing the number of objects per image to 15.
This parameter has the biggest impact on the VRAM consumption and quality of the finetuned model.
You can find an overview of the resources we have tested for finetuning here.
We also provide a the convenience function micro_sam.training.train_sam_for_configuration that selects the best training settings for these configuration. This function is also used by the finetuning UI.
9. I want to create a dataloader for my data, to finetune Segment Anything.
Thanks to torch-em, a) Creating PyTorch datasets and dataloaders using the python library is convenient and supported for various data formats and data structures.
See the tutorial notebook on how to create dataloaders using torch-em and the documentation for details on creating your own datasets and dataloaders; and b) finetuning using the napari tool eases the aforementioned process, by allowing you to add the input parameters (path to the directory for inputs and labels etc.) directly in the tool.
NOTE: If you have images with large input shapes with a sparse density of instance segmentations, we recommend using
samplerfor choosing the patches with valid segmentation for the finetuning purpose (see the example for PlantSeg (Root) specialist model inmicro_sam).
10. How can I evaluate a model I have finetuned?
To validate a Segment Anything model for your data, you have different options, depending on the task you want to solve and whether you have segmentation annotations for your data.
- If you don't have any annotations you will have to validate the model visually. We suggest doing this with the
micro_samGUI tools. You can learn how to use them in themicro_samdocumentation. - If you have segmentation annotations you can use the
micro_sampython library to evaluate the segmentation quality of different models. We provide functionality to evaluate the models for interactive and for automatic segmentation:- You can use
micro_sam.evaluation.evaluation.run_evaluation_for_iterative_promptingto evaluate models for interactive segmentation. - You can use
micro_sam.evaluation.instance_segmentation.run_instance_segmentation_grid_search_and_inferenceto evaluate models for automatic segmentation.
- You can use
We provide an example notebook that shows how to use this evaluation functionality.
Contribution Guide
- Discuss your ideas
- Clone the repository
- Create your development environment
- Make your changes
- Testing
- Open a pull request
- Optional: Build the documentation
- Optional: Benchmark performance
Discuss your ideas
We welcome new contributions! First, discuss your idea by opening a new issue in micro-sam. This allows you to ask questions, and have the current developers make suggestions about the best way to implement your ideas.
Clone the repository
We use git for version control.
Clone the repository, and checkout the development branch:
$ git clone https://github.com/computational-cell-analytics/micro-sam.git
$ cd micro-sam
$ git checkout dev
Create your development environment
We use conda to manage our environments. If you don't have this already, install miniconda or mamba to get started.
Now you can create the environment, install user and developer dependencies, and micro-sam as an editable installation:
conda env create environment.yaml
conda activate sam
python -m pip install requirements-dev.txt
python -m pip install -e .
Make your changes
Now it's time to make your code changes.
Typically, changes are made branching off from the development branch. Checkout dev and then create a new branch to work on your changes.
$ git checkout dev
$ git checkout -b my-new-feature
We use google style python docstrings to create documentation for all new code.
You may also find it helpful to look at this developer guide, which explains the organization of the micro-sam code.
Testing
Run the tests
The tests for micro-sam are run with pytest
To run the tests:
$ pytest
Writing your own tests
If you have written new code, you will need to write tests to go with it.
Unit tests
Unit tests are the preferred style of tests for user contributions. Unit tests check small, isolated parts of the code for correctness. If your code is too complicated to write unit tests easily, you may need to consider breaking it up into smaller functions that are easier to test.
Tests involving napari
In cases where tests must use the napari viewer, these tips might be helpful (in particular, the make_napari_viewer_proxy fixture).
These kinds of tests should be used only in limited circumstances. Developers are advised to prefer smaller unit tests, and avoid integration tests wherever possible.
Code coverage
Pytest uses the pytest-cov plugin to automatically determine which lines of code are covered by tests.
A short summary report is printed to the terminal output whenever you run pytest. The full results are also automatically written to a file named coverage.xml.
The Coverage Gutters VSCode extension is useful for visualizing which parts of the code need better test coverage. PyCharm professional has a similar feature, and you may be able to find similar tools for your preferred editor.
We also use codecov.io to display the code coverage results from our Github Actions continuous integration.
Open a pull request
Once you've made changes to the code and written some tests to go with it, you are ready to open a pull request. You can mark your pull request as a draft if you are still working on it, and still get the benefit of discussing the best approach with maintainers.
Remember that typically changes to micro-sam are made branching off from the development branch. So, you will need to open your pull request to merge back into the dev branch like this.
Optional: Build the documentation
We use pdoc to build the documentation.
To build the documentation locally, run this command:
$ python build_doc.py
This will start a local server and display the HTML documentation. Any changes you make to the documentation will be updated in real time (you may need to refresh your browser to see the changes).
If you want to save the HTML files, append --out to the command, like this:
$ python build_doc.py --out
This will save the HTML files into a new directory named tmp.
You can add content to the documentation in two ways:
- By adding or updating google style python docstrings in the micro-sam code.
- pdoc will automatically find and include docstrings in the documentation.
- By adding or editing markdown files in the micro-sam
docdirectory.- If you add a new markdown file to the documentation, you must tell pdoc that it exists by adding a line to the
micro_sam/__init__.pymodule docstring (eg:.. include:: ../doc/my_amazing_new_docs_page.md). Otherwise it will not be included in the final documentation build!
- If you add a new markdown file to the documentation, you must tell pdoc that it exists by adding a line to the
The documentation is built and deployed to GitHub Pages automatically by the build_documentation GitHub Action; there is no need to build and deploy it manually. This workflow runs whenever a new release is created, on pushes to main that touch the Python or markdown documentation files, and on manual dispatch from the Actions tab.
Optional: Benchmark performance
There are a number of options you can use to benchmark performance, and identify problems like slow run times or high memory use in micro-sam.
Run the benchmark script
There is a performance benchmark script available in the micro-sam repository at development/benchmark.py.
To run the benchmark script:
$ python development/benchmark.py --model_type vit_t --device cpu`
For more details about the user input arguments for the micro-sam benchmark script, see the help:
$ python development/benchmark.py --help
Line profiling
For more detailed line by line performance results, we can use line-profiler.
line_profiler is a module for doing line-by-line profiling of functions. kernprof is a convenient script for running either
line_profileror the Python standard library's cProfile or profile modules, depending on what is available.
To do line-by-line profiling:
- Ensure you have line profiler installed:
python -m pip install line_profiler - Add
@profiledecorator to any function in the call stack - Run
kernprof -lv benchmark.py --model_type vit_t --device cpu
For more details about how to use line-profiler and kernprof, see the documentation.
For more details about the user input arguments for the micro-sam benchmark script, see the help:
$ python development/benchmark.py --help
Snakeviz visualization
For more detailed visualizations of profiling results, we use snakeviz.
SnakeViz is a browser based graphical viewer for the output of Python’s cProfile module.
- Ensure you have snakeviz installed:
python -m pip install snakeviz - Generate profile file:
python -m cProfile -o program.prof benchmark.py --model_type vit_h --device cpu - Visualize profile file:
snakeviz program.prof
For more details about how to use snakeviz, see the documentation.
Memory profiling with memray
If you need to investigate memory use specifically, we use memray.
Memray is a memory profiler for Python. It can track memory allocations in Python code, in native extension modules, and in the Python interpreter itself. It can generate several different types of reports to help you analyze the captured memory usage data. While commonly used as a CLI tool, it can also be used as a library to perform more fine-grained profiling tasks.
For more details about how to use memray, see the documentation.
Creating a new release
To create a new release you have to edit the version number in micro_sam/__version__.py in a PR. After merging this PR the release will automatically be done by the CI.
Using micro_sam on BAND
BAND is a service offered by EMBL Heidelberg under the "The German Network for Bioinformatics Infrastructure" (de.NBI) that gives access to a virtual desktop for image analysis tasks. It is free to use and micro_sam is installed there.
In order to use BAND and start micro_sam on it follow these steps:
Start BAND
- Go to https://bandv1.denbi.uni-tuebingen.de/ (another site available at https://band.vm.fedcloud.eu/, choose either) and click Login. If you have not used BAND before you will need to register for BAND. Currently you can only sign up via a Google account. NOTE: It takes a couple of seconds for the "Launch Desktops" window to appear.
- Launch a BAND desktop with sufficient resources. It's particularly important to select a GPU. The settings from the image below are a good choice.
- Go to the desktop by clicking GO TO DESKTOP in the Running Desktops menu. See also the screenshot below.
Start micro_sam in BAND
Select Applications -> Image Analysis -> microSAM (see screenshot)
This will open the napari GUI, where you can select the images and annotator tools you want to use (see screenshot). NOTE: this may take a few minutes.
For testing if the tool works, it's best to use the Annotator 2d first.
- You can find an example image to use by selection
File->Open Sample->Segment Anything for Microscopy->HeLa 2d example data(see screenshot)
- You can find an example image to use by selection
- Then select
Plugins->Segment Anything for Microscopy->Annotator 2d, and the tool will start.
Transfering data to BAND
To copy data to and from BAND you can use any cloud storage, e.g. ownCloud, dropbox or google drive. For this, it's important to note that copy and paste, which you may need for accessing links on BAND, works a bit different in BAND:
- To copy text into BAND you first need to copy it on your computer (e.g. via selecting it +
Ctrl + C). - Then go to the browser window with BAND and press
Ctrl + Shift + Alt. This will open a side window where you can paste your text viaCtrl + V. - Then select the text in this window and copy it via
Ctrl + C. - Now you can close the side window via
Ctrl + Shift + Altand paste the text in band viaCtrl + V
The video below shows how to copy over a link from owncloud and then download the data on BAND using copy and paste:
 1"""
 2.. include:: ../doc/start_page.md
 3.. include:: ../doc/installation.md
 4.. include:: ../doc/annotation_tools.md
 5.. include:: ../doc/cli_tools.md
 6.. include:: ../doc/python_library.md
 7.. include:: ../doc/finetuned_models.md
 8.. include:: ../doc/apg.md
 9.. include:: ../doc/data_submission.md
10.. include:: ../doc/faq.md
11.. include:: ../doc/contributing.md
12.. include:: ../doc/band.md
13"""
14
15import os
16
17from .__version__ import __version__
18
19os.environ["PYTORCH_ENABLE_MPS_FALLBACK"] = "1"