synapse_net
SynapseNet: Deep Learning for Automatic Synapse Reconstruction
SynapseNet is a tool for automatic segmentation and analysis of synapses in electron micrographs. It provides deep neural networks for:
- Synaptic vesicle segmentation in ssTEM (2d data) and (cryo-)electron tomography (3d data)
- Active zone membrane segmentation in electron tomography.
- Mitochondrion segmentation in electron tomography.
- Synaptic compartment segmentation in electron tomography.
- Synaptic ribbon and pre-synaptic density segmentation for ribbon synapses in electron tomography.
It also offers functionality for quantifying synaptic ultrastructure based on segmentation results, for example by measuring vesicle or structure morphology, measuring distances between vesicles and structures, or assigning vesicles into different pools. SynapseNet mainly targets electron tomography, but can also be appled to other types of electron microscopy, especially throught the domain adaptation functionality.
SynapseNet offers a napari plugin, command line interface, and python library. Please cite our bioRxiv preprint if you use it in your research.
Requirements & Installation
SynapseNet was tested on all operating systems (Linux, Mac, Windows).
SynapseNet requires a GPU or a Macbook with M chipset for the segmentation of 3D volumes.
It can be installed via conda
(or mamba) and pip.
To install in an existing Python environment follow these steps:
- First, download the SynapseNet repository via
git clone https://github.com/computational-cell-analytics/synapse-net
- Then, enter the
synapse-netfolder:
cd synapse-net
- Then, install the
synapse-netvia pip:
pip install -e .
To install it in a new conda environment follow these steps:
- First, download the SynapseNet repository via
git clone https://github.com/computational-cell-analytics/synapse-net
- Then, enter the
synapse-netfolder:
cd synapse-net
- Now you can install the environment for SynapseNet with
condafrom the environment file we provide:
conda env create -f environment.yaml
- You will need to confirm this step. It will take a while. Afterwards you can activate the environment:
conda activate synapse-net
- Finally, install SynapseNet itself into the environment:
pip install -e .
Now you can use all SynapseNet features. From now on, just activate the environment via
conda activate synapse-net
to use them.
Note: If you use
mambainstead of conda just replacecondain the commands above withmamba.
Updating SynapseNet
If you have installed SynapseNet following the instructions above then you can update it like this:
- Go to the folder where you have downloaded SynapseNet in a terminal, e.g. via
cd synapse-net - Then get the latest changes via git:
git pull origin main
- And rerun the pip installation:
pip install -e .
After this SynapseNet will be up-to-date and you can use the latest features!
Segmentation Models
We currently offer seven different models for segmenting synaptic structures:
vesicles_3dto segment vesicles in (room-temperature) electron tomograms.vesicles_2dto segment vesicles in two-dimensional electron micrographs.vesicles_cryoto segment vesicles in cryogenic electron tomograms.active_zoneto segment active zones in electron tomograms.compartmentsto segment synaptic compartments in electron tomograms.mitochondriato segment mitochondria in electron tomograms.ribbonto segment structures of the active zones in ribbon synapses (ribbon, presynaptic density and active zone membrane) in electron tomograms.
Napari Plugin
You can find a video tutorial for the SynapseNet napari plugin on YouTube. Below, we explain the different plugin components with screenshots.
After installing SynapseNet you can start napari by activating the synapse-net environment (or another environment you installed it in) and executing the napari command.
Once napari is opened, you can load a tomogram (or other image data), by drag'n'dropping the corresponding mrc file onto the napari window.
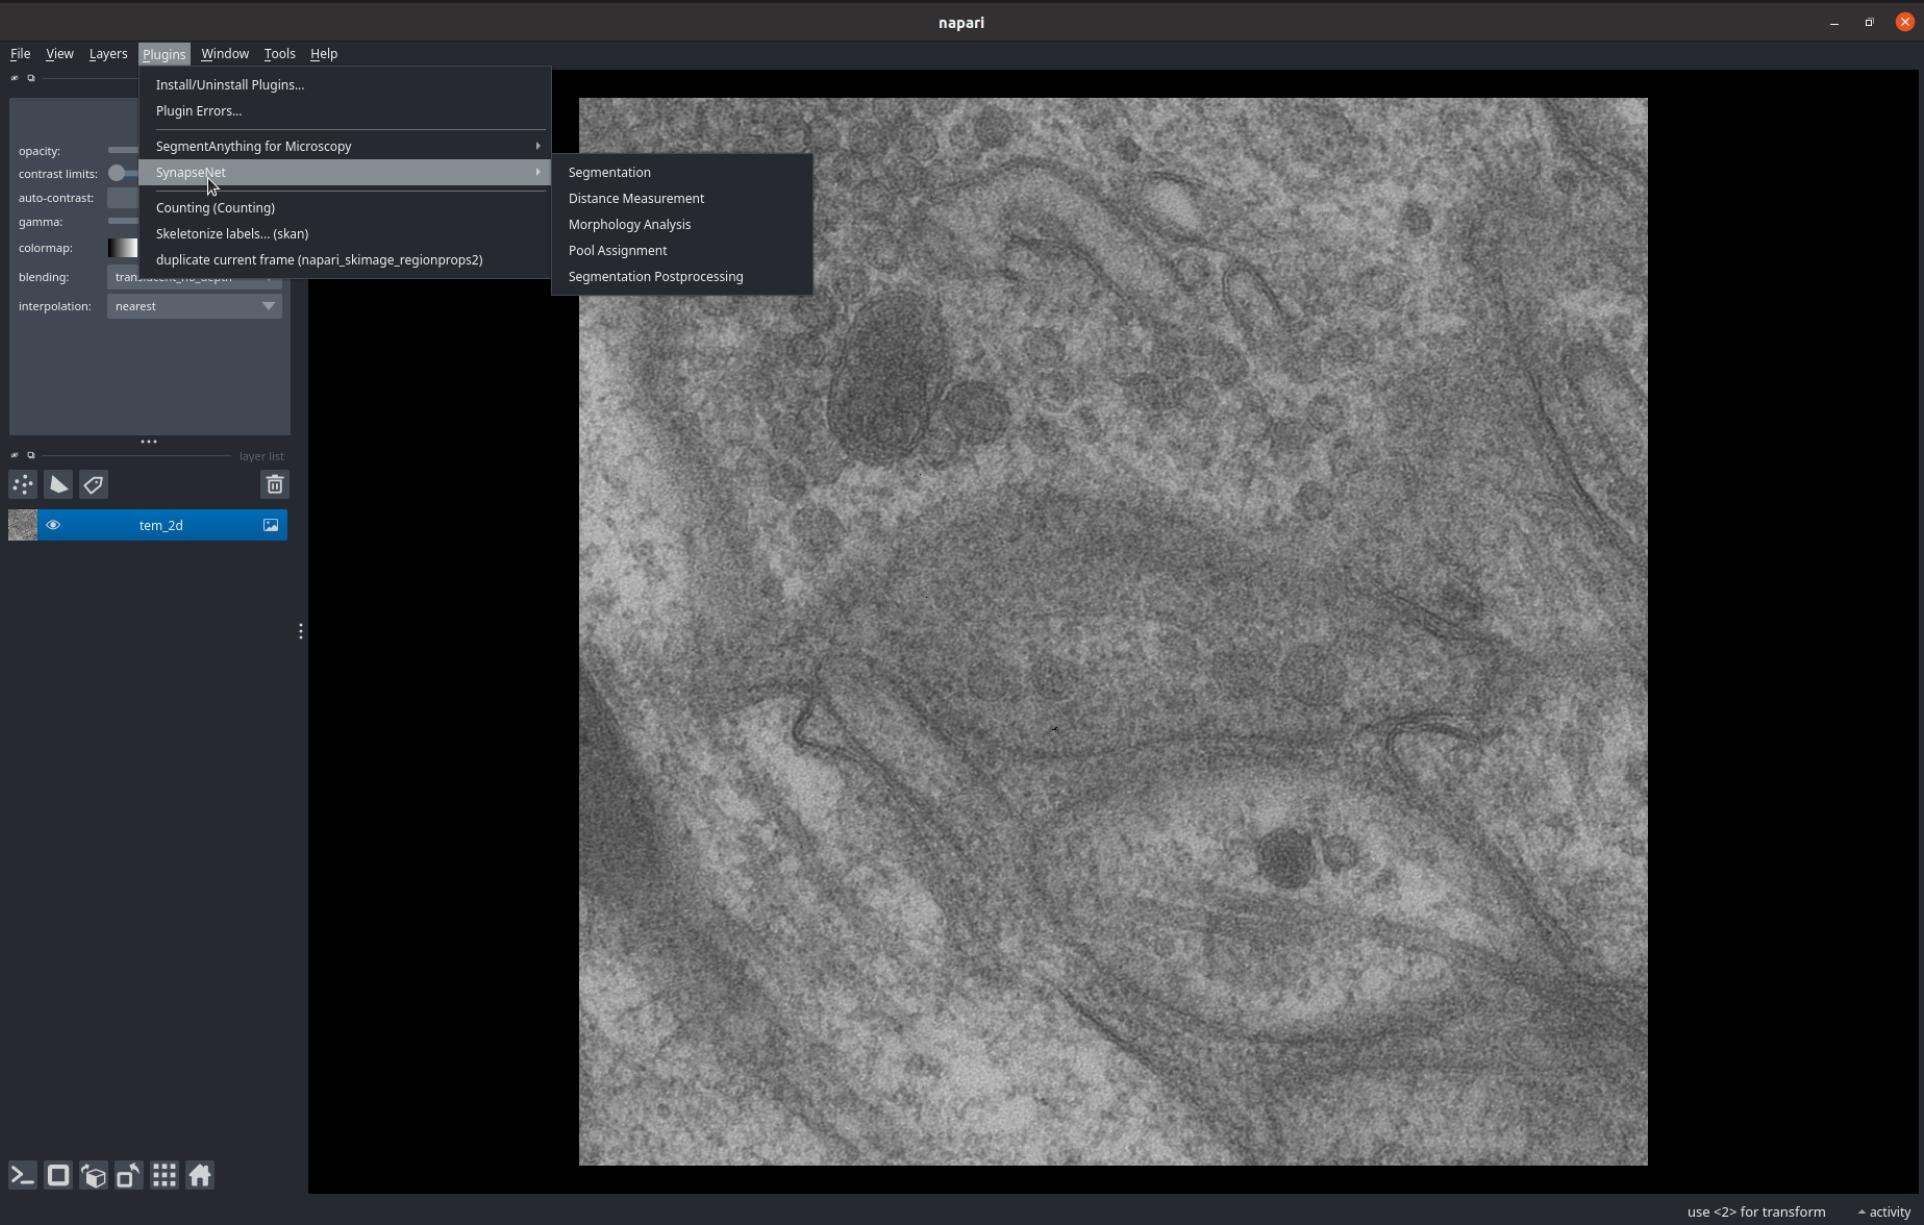
You can find the SynapseNet widgets in the menu Plugin->SynapseNet, see also the screenshot below.
We currently provide five different plugins, which are explained in the following paragraphs.
The Segmentation widget enables segmenting synaptic structures with the SynapseNet models.
You can select the image layer for which to run segmentation from the Image data dropdown and the model to use from the Select Model dropdown.
Then press Run Segmentation. To display a progress bar click on activity in the lower right.
The screenshot below shows the Segmentation UI and a segmentation result for 2D vesicle segmentation.

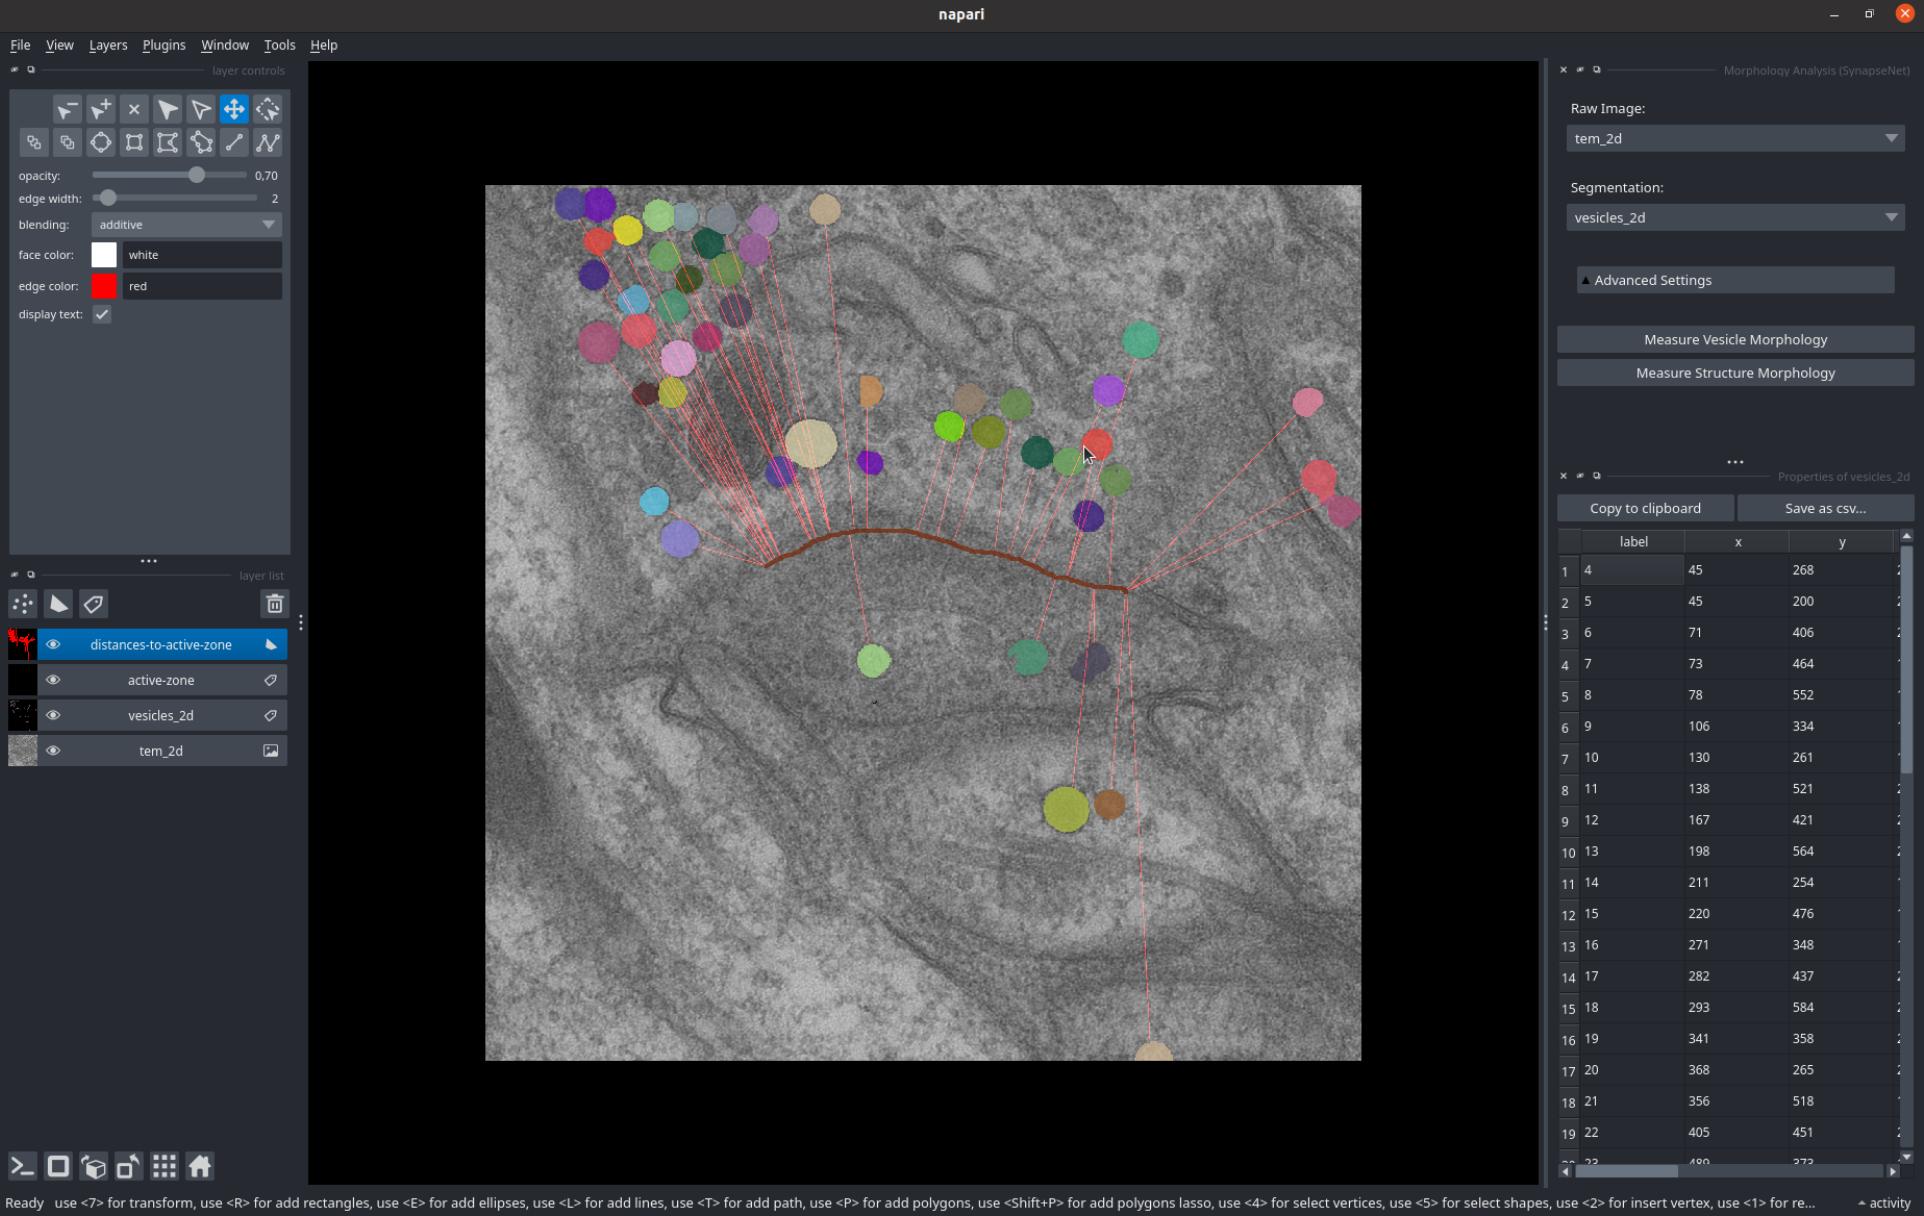
The Distance Measurement widget measures distances between segmented vesicles and another object. You can select the vesicle segmentation from the Segmentation dropdown and the object from the Object dropdown.
Then press Measure Distances to measure the distances, which will be displayed as red lines in the image.
The measured values will be shown in a table, which can also be saved to a csv file.
The screenshot below shows distances measured between the vesicles and active zone (red structure).
Alternatively, you can measure the pairwise distances between individual vesicles via Measure Pairwise Distances.

The Morphology Analysis widget measures morphometric features, such as radii and intensity statistics for vesicles, or surface area and volume for other structures. The widget functions similar to the distance measurement.
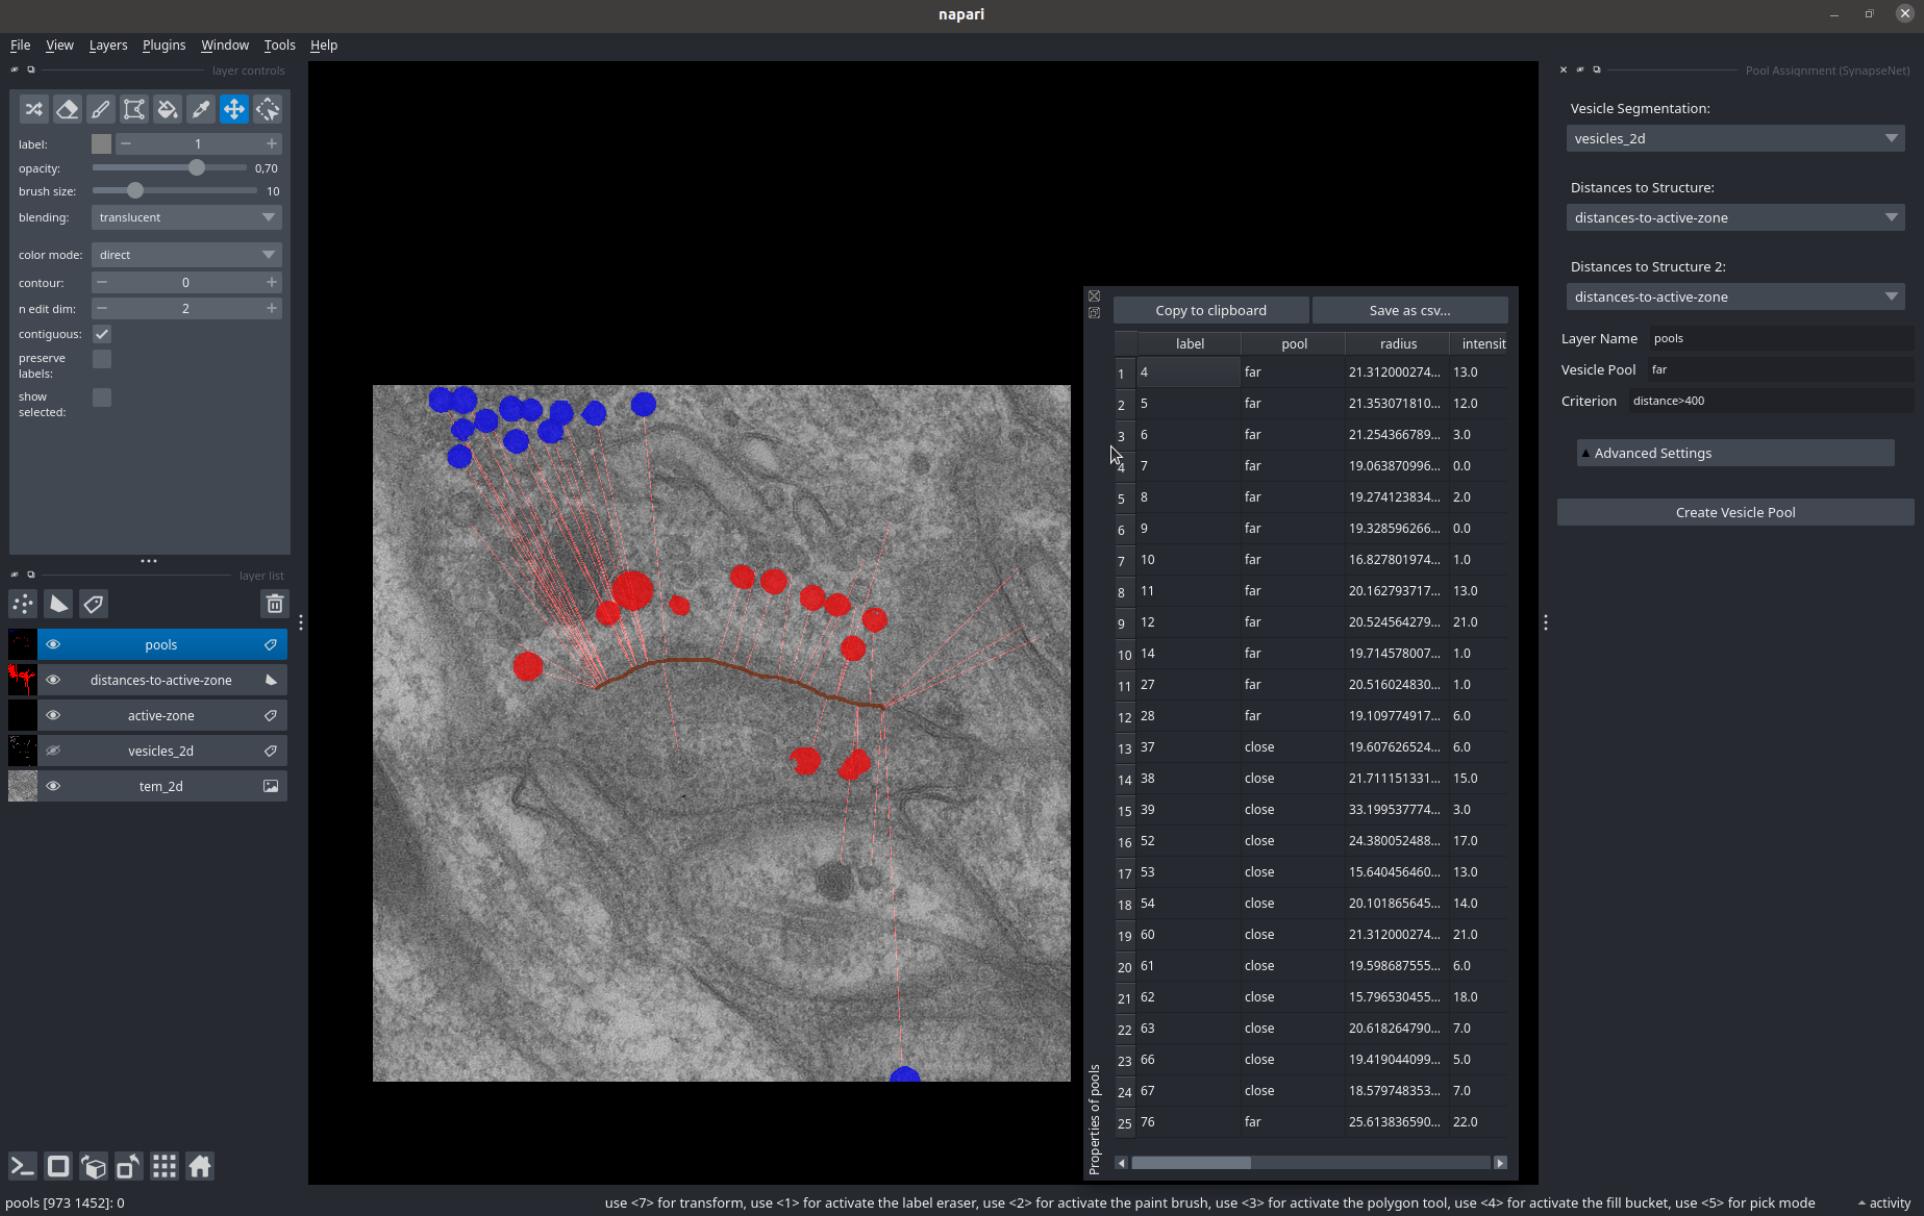
The Pool Assignment widget groups vesicles into different pools based on the distance and morphology measurements from the previous widgets.
Select the vesicles via the Vesicle Segmentation dropdown and the distances to up to two different structures via Distances to Structure and Distances to Structure 2.
Then, specify the name for a new layer where the pools will be saved via Layer Name, the name for the current pool via Vesicle Pool and the criterion for the pool via Criterion. Pressing Create Vesicle Pool creates the assignment for the pool by copying the vesicles that meet the criterion to the specified layer.
You can press it multiple times for different criteria to group the vesicles into different pools.
The screenshot below shows a grouping of vesicles into 'close' (red) and 'far' (blue) vesicles based on their distance to the active zone.
In addition, the Segmentation Postprocessing widget can be used to filter out objects that do not overlap with a mask, e.g. a synaptic compartment, or to intersect a segmentation with the boundaries of a mask.
Command Line Interface
SynapseNet provides a command line interface to segment synaptic structures in mrc files (or other image formats), and to export segmentation results to IMOD.
Segmentation CLI: The command synapse_net.run_segmentation enables segmentation with all of our supported models. For example, you can call it like this:
synapse_net.run_segmentation -i /path/to/folder-with-mrc -o /path/to/save-segmentation -m vesicles_3d
to segment the synaptic vesicles in all tomograms that are stored as mrc files in the folder /path/to/folder-with-mrc. The segmentations will be stored as tif files in the (new) folder /path/to/save-segmentation.
You can select a different segmentation model by changing the name after -m. For example use -m mitochondria to segment mitochondria or -m vesicles_2d to segment vesicles in 2D images.
The command offers several other arguments to change the segmentation logic; you can run synapse_net.run_segmentation -h for an explanation of these arguments.
IMOD Export: We offer two commands to export segmentation results to mod files that can be opened with 3dmod, which is part of the IMOD software suite:
synapse_net.export_to_imod_pointsto export a vesicle segmentation to a point model; i.e., representing each vesicle as a sphere.synapse_net.export_to_imod_objectsto export an arbitrary segmentation to a closed contour model.
For example, you can run
synapse_net.export_to_imod_points -i /path/to/folder-with-mrc -s /path/to/save-segmentation -o /path/to/save-modfiles
to export the segmentations saved in /path/to/save-segmentation to point models that will be saved in /path/to/save-modfiles.
For more options supported by the IMOD exports, please run synapse_net.export_to_imod_points -h or synapse_net.export_to_imod_objects -h.
Note: to use these commands you have to install IMOD.
SynapseNet also provides two CLI comamnds for training models, one for supervised network training (see Supervised Training for details) and one for domain adaptation (see Domain Adaptation for details).
Python Library
Using the synapse_net python library offers the most flexibility for using SynapseNet's functionality.
You can find an example analysis pipeline implemented with SynapseNet here.
We offer different functionality for segmenting and analyzing synapses in electron microscopy:
synapse_net.inferencefor segmenting synaptic structures with our models.synapse_net.distance_measurementsfor measuring distances between segmented objects.synapse_net.imodfor importing and exporting segmentations from / to IMOD.synapse_net.trainingfor training U-Nets for synaptic structure segmentation, either via domain adaptation or using data with annotations.
Please refer to the module documentation below for a full overview of our library's functionality.
Supervised Training
SynapseNet provides functionality for training a UNet for segmentation tasks using supervised learning.
In this case, you have to provide data and (manual) annotations for the structure(s) you want to segment.
This functionality is implemented in synapse_net.training.supervised_training. You can find an example script that shows how to use it here.
We also provide a command line function to run supervised training: synapse_net.run_supervised_training.
It enables training on data and labels stored in files. Multiple file formats, such as mrc, tif, and hdf5 are supported.
For example, to train a network for vesicle segmentation from mrc files stored in separate folders for training and validation data:
synapse_net.run_supervised_training \
    -n my-vesicle-model \  # The name of the model checkpoint.
    --train_folder /path/to/train/tomograms \ # The path to the tomograms to use for training.
    --image_file_pattern *.mrc \ # For mrc files, replace if you have a different file type.
    --label_folder /path/to/train/labels  \ # The path to the vesicle annotations for training.
    --label_file_pattern *.mrc \ # For labels stored as mrc, replace if you have a different file type.
    --val_folder /path/to/val/tomograms \ # The path to the tomograms to use for validation.
    --val_label_folder /path/to/val/labels \ # The path to the vesicle annotations for training.
    --patch_shape 48 256 256 \ # The patch shape in ZYX.
    --batch_size 2 \ # The batch size for training.
    --initial_model vesicles_3d \ # The model to use for weight initialization.
    --n_iterations 25000 \ # The number of iterations to train for.
In this case, the model is initialized with the weight's of the 3d vesicle segmentation model due to the choice of initial_model. You can also choose a model for a different task here, e.g. mitochondria or leave out this argument to train a randomly initialized model.
Run
synapse_net.run_supervised_training -h
for more information and instructions on how to use the command.
Domain Adaptation
SynapseNet provides functionality for (unsupervised) domain adaptation.
This functionality is implemented through a student-teacher training approach that can improve segmentation for data from a different condition (for example different sample preparation, imaging technique, or different specimen), without requiring additional annotated structures.
Domain adaptation is implemented in synapse_net.training.domain_adaptation. You can find an example script that shows how to use it here.
We also provide a command line function to run domain adaptation: synapse_net.run_domain_adaptation.
It enables training on data in local files. Multiple file formats, such as mrc, tif, and hdf5 are supported.
For example, to adapt the network for vesicle segmentation based on mrc files:
synapse_net.run_domain_adaptation \
    -n my-adapted-vesicle-model \  # The name of the model checkpoint.
    --input_folder /path/to/tomograms  \  # The folder with the tomograms to train on.
    --file_pattern *.mrc \ # For mrc files, replace if you have a different file type.
    --source_model vesicles_3d \ # To adapt the model for 3D vesicle segmentation.
    --patch_shape 48 256 256 \ # The patch shape for training.
    --n_iterations 10000 \ # The number of iterations to train for.
Run
synapse_net.run_domain_adaptation -h
for more information and instructions on how to use the command.
Note: Domain adaptation only works if the initial model already finds some of the structures in the data from a new condition. If it does not work you will have to train a network on annotated data.
Segmentation for the CryoET Data Portal
We have published segmentation results for tomograms of synapses stored in the CryoET Data Portal. So far we have made the following depositions:
- CZCDP-10330: Contains synaptic vesicle segmentations for over 50 tomograms of synaptosomes. The segmentations were made with a model domain adapted to the synaptosome tomograms.
The scripts for the submissions can be found in scripts/cryo/cryo-et-portal.
Community Data Submission
We are looking to extend and improve the SynapseNet models by training on more annotated data from electron tomography or (volume) electron microscopy. For this, we plan to collect data from community submissions.
If you are using SynapseNet for a task where it does not perform well, or if you would like to use it for a new segmentation task not offered by it, and have annotations for your data, then you can submit this data to us, so that we can use it to train our next version of improved models. To do this, please create an issue on github and:
- Use a title "Data submission: ..." ("..." should be a title for your data, e.g. "smooth ER in electron tomography")
- Briefly describe your data and add an image that shows the microscopy data and the segmentation masks you have.
- Make sure to describe:
- The imaging modality and the structure(s) that you have segmented.
- How many images and annotations you have / can submit and how you have created the annotations.
- You should submit at least 5 images or crops and 20 annotated objects. If you are unsure if you have enough data please go ahead and create the issue / post and we can discuss the details.
- Which data-format your images and annotations are stored in. We recommend using either
tif,mrc, orome.zarrfiles.
- Please indicate that you are willing to share the data for training purpose (see also next paragraph).
Once you have created the post / issue, we will check if your data is suitable for submission or discuss with you how it could be extended to be suitable. Then:
- We will share an agreement for data sharing. You can find a draft here.
- You will be able to choose how you want to submit / publish your data.
- Share it under a CC0 license. In this case, we will use the data for re-training and also make it publicly available as soon as the next model versions become available.
- Share it for training with the option to publish it later. For example, if your data is unpublished and you want to only published once the respective publication is available. In this case, we will use the data for re-training, but not make it freely available yet. We will check with you peridiodically to see if your data can now be published.
- Share it for training only. In this case, we will re-train the model on it, but not make it publicly available.
- We encourage you to choose the first option (making the data available under CC0).
- We will then send you a link to upload your data, after you have agreed to these terms.